Pages

Wednesday, 22 February 2017

Style Arc Rae Tunic


Style Arc Rae Tunic
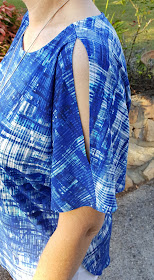
I chose this lovely Poly/Spandex knit from Knitwit to try out the Style Arc Rae Tunic. I love a good tunic and I have been wanting to try out the cold shoulder trend for a while now, so this pattern ticked all the boxes for me.


Style Arc Rae Tunic
Suggested fabrics are crepe, silk or even a knit. That makes this a very versatile pattern. I dispensed with the button and loop back neck closure, as it was not required. The tunic slips easily over your head (in a knit, anyway).


I cut my usual size 12, with no alterations, but in hindsight I probably should have done a forward shoulder adjustment. The tunic is quite loose fitting and skims nicely over any lumpy bits.


I like the length of the tunic...plenty of backside coverage. I am wearing it with my Style Arc Elle's in white stretch bengaline, made ages ago. This tunic only takes 85cm of 148cm wide fabric (sizes 4-16, slightly more in the larger sizes). You must have a seam at the centre back to squeeze it out of this yardage though.


Application of Bondaweb to hems
I have found when working with these slinky poly/spandex knits, the application of Bondaweb to the hems assists in stabilising the area and results in perfect stitching. I also used Bondaweb in the shoulder seams as I wanted that extra stability for the top stitching.


Sewing knits with my walking foot.
My walking foot also helps enormously when sewing with knits. It's great to learn all these little tricks and see the quality of your sewing improve. 


Loving the cold shoulder feature and it's perfectly bra friendly too. I used a knit binding turned completely to the inside, and top stitched, to finish off the neckline.


Another great feature of the Rae Tunic is the curved hem.


This photo shows the real shape of the tunic with the cut on sleeves. After wearing this to work today, I can report that it is very comfortable and I enjoyed wearing it. I have two pieces of rayon purchased recently with this pattern in mind. It will be interesting to see how it compares in a woven fabric to this one in a knit.


Happy sewing

Jean.

Thursday, 16 February 2017

Style Arc Adeline Dress #3 in Tencel

Style Arc Adeline Dress
I just can't leave this pattern alone. This is Style Arc Adeline Dress # 3 for me. You can see # 1 here and # 2 here.


It is a simple cocoon style dress yet, I feel effortlessly stylish when I put it on. This was my first experience sewing with Tencel and I am in love. After a little internet research I learned that this is a natural fibre produced from wood pulp, similar to rayon but more sustainable. It is soft, drapey, breathable and wrinkle resistant. What's not to love? I found it similar to rayon, but a little better behaved when it comes to cutting and sewing. It pressed beautifully. I used a microtex needle size 80 which worked very well.


For this version I cut a size 12, as usual. The only alteration to the pattern was a forward shoulder adjustment which I explained in this post. Such a minor adjustment that has a big impact on comfort.


The look can be changed easily by the addition of a scarf or a statement necklace. This lovely gauze scarf was a great way to keep the chill at bay in my air conditioned office .


As the fabric was quite plain, I top stitched all the seams to add a little visual interest. It also kept the seam allowances nice and flat. The neckline and hemline facings were also top stitched. 


I made a silly mistake when top stitching the side seams. I had completed one side perfectly and then went on to do the second side. Half way up the second side seam I realised that I had forgotten to lengthen the stitch to match all the other top stitching. I might have uttered a few swear words under my breath and proceeded to unpick my mistake. After I had unpicked quite a lot, I realised I was unpicking the wrong side. More swear words ensued and it was thrown in the naughty corner for a couple of days. 


The cuffs are a lovely detail and are so easy to do. This is a great pattern that is so well drafted and goes together very easily. I really can't stop singing it's praises.


I love it when an outfit turns out just as I had imagined it would.

Happy sewing

Jean

Monday, 6 February 2017

Style Arc Courtney Top from Leftovers


The Style Arc Courtney Top is a great pattern for trying out some colour blocking. I was rummaging through my fabric stash looking for something suitable, when I came across the left over floral cotton/linen blend from this dress and the white linen left overs from this shirt. I had just enough of both the fabrics to combine the two and create this top.

Style Arc Courtney Top
  
This top has some lovely design features and was fairly quick and relatively easy to construct. There are no darts or closures to worry about and the fit is meant to be loose, so there are no fitting issues to deal with either.


I love the combination of the plain and the busy fabrics. I think the white tones down the busy print and the combination has worked well. I am wearing it here with my purple Colette Mabel skirt which tones in well with the purple flowers in the floral print.


Even in this cotton/linen blend fabric, the shape of the blouse is not too boxy or shapeless. I love the interesting detail that the back yoke and gathers give to the back. I cut a size 12 and made it up with out any alteration to the pattern. It was drafted beautifully and went together easily.


I top stitched all the seams, except the side seams. I like the extra detail it adds to the top and it also keeps the seam allowances lying nice and flat. The arm bands are designed to be turned up like a cuff, but I preferred them left like this. The white arm bands help tie in the front panel and give a nice balance to the garment.


The raw edge at the hem was over locked and turned up and secured with a top stitch. I wanted to preserve as much length as possible. If I was to make this again I would lengthen it a couple of centimetres, especially if I planned to wear it with pants, rather than a skirt. I have a long body and I find a longer top suits my figure better.


The neckband is a length of bias cut linen stitched to the neckline and then cover stitched to finish it off. I have still got my L plates on with my cover stitch machine, but I was pretty pleased with how this turned out. A little bit wobbly on one shoulder, but not too bad.


I am quite pleased with my Courtney Top and very pleased that I was able to create it out of some left over fabrics too. I can see a few more of these in my wardrobe soon.

Happy Sewing

Jean

Wednesday, 1 February 2017

Style Arc Elsie Woven Overshirt in Polka Dots


Style Arc Elsie Woven Overshirt 
I have made the Style Arc Elsie Woven Overshirt. It's hot off the sewing machine last night and worn to work today. The perfect shirt for our unseasonably cool day of 20 degrees Celsius, compared to the day before yesterday when we experienced 43 degrees. 

Style Arc Elsie Woven Overshirt
From the Style Arc Website: This square shaped shirt features the trendy reverse revere, patch pockets and roll up sleeves. A must have shirt in your wardrobe for all seasons.


I made a size 12 without any alterations. The fabric is a navy and white polka dot rayon purchased from Spotlight back in November last year. Being rayon, it has a lovely drape which tones down the boxyness of this shirt, as described by Style Arc. However, it was a nightmare to cut and sew.


I decided to take my time, and sew in shorter stints over several days, to reduce the frustration. I was able to start each time with renewed enthusiasm. There was a bit of unpicking and resewing as that rayon seems to have a mind of it's own, but I'm glad I persevered and I am pleased with the result...not perfect, but good enough.


I am wearing it today with my Style Arc Elle Pants in navy stretch bengaline. These were made back in 2014 and are starting to look a little shabby. Must be time to make some more.


The Elsie has some lovely details. I particularly love the reverse revere collar. I used a lightweight fusible knit interfacing from Spotlight in the bands and cuffs, which worked very well with the rayon. I decided not to add the patch pockets as the rayon was a bit sheer and the polka dots showing through the pockets was not a good look. 


There is a box pleat at the centre back which creates the loose fit. The yoke is unlined, and does feel a little flimsy in the rayon. This could easily be remedied in any future makes.


The high low hem and side splits are very on trend and I love the backside coverage it provides. The hem was simply overlocked and turned up 1cm and top stitched (mitred corners). I did stabilise the edge with Bondaweb before top stitching and it helped a lot. Next time I would add to the hem to allow it to be turned up twice as it would give a much nicer finish.


I followed these instructions to sew the binding on the sleeve slits, which was excellent. Style Arc's instructions are really just an order of construction. I feel that they got this a little out of order, sewing the sleeve binding after the sleeve had been sewn to the body of the shirt and the side seams sewn. This was quite difficult, but would have been much easier if done while the sleeve was flat. So do step 11 after step 8 and before step 9.


One issue I did have with the Elsie while wearing it today, was that the sleeve tabs kept falling out of the sleeve slits. They do seem to be unnecessarily long...something I will change in the next one.


Overall, I am loving my new Elsie Woven Overshirt and I can see it going with several other garments in my wardrobe too.

Happy Sewing

Jean