 |
| My two youngest offspring. |
My youngest son returned to Medical School yesterday, to begin his second year of study. He will be based at Shepparton Hospital in Victoria, this year, and will be required to wear doctor appropriate clothing, five days a week. I have been promising to sew him a shirt for ages, so I finally thought I had better make good on that promise, especially now that he has a genuine need for decent button-up shirts.
 |
| Thread Theory Designs Fairfield Button-Up |
The pattern I used was the Thread Theory Design Fairfield Button-Up shirt. I ordered the printed pattern through Pattern Review and was amazed at how quickly it was delivered to me in regional NSW Australia. It comes packaged in a lovely cardboard sleeve. Inside is the multi sized pattern printed on tissue paper. There are pattern pieces for average figures, as well as fuller figures, and also a comprehensive and well illustrated instruction booklet. I also found the online Sew-a-long very helpful.
 |
| Thread Theory Design Fairfield Button-Up |
Luckily I used a super stretch cotton poplin from The Remnant Warehouse which has quite a bit of stretch, as the shirt is a little too narrow across the shoulders. As the fabric stretches, it is wearable, but I will size up for the next one. If I had made this in a non stretch fabric, it would have been too uncomfortable to wear.
I didn't make any design changes to the shirt and sewed it up exactly as instructed. The front button band is not a separate piece, which reduces bulk and I really like how it turned out. Not sure if I love the pocket design, but it turned out ok. Apparently Thread Theory Designs offer some alternative pocket designs that can be downloaded for free. I will have to look into this for the next one.
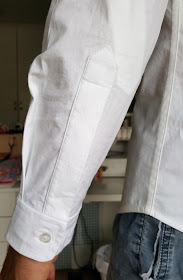
The pattern includes all the usual features of a typical men's shirt including tower plackets. I have had terrible trouble in the past with fusible interfacings that bubble, so I decided to use a sew in interfacing for this shirt, and had much better results. I interfaced the sleeve plackets too as I was concerned that the stretch fabric might be too easily distorted when sewing these. I'm quite pleased with how they turned out. I skipped adding the extra button half way along the placket, as this shirt will most probably be worn with the sleeves rolled up most of the time.
Sleeve tabs are also included in the pattern. This is a handy feature as I just said: the sleeves will be rolled up most of the time. The sleeve length was a little short, despite cutting the medium length, so I will lengthen the sleeves a couple of centimetres for the next one.
The pattern was unusual in that the pattern pieces were cut already graded for the flatfelled seams. This took a bit for me to get my head around, as I am used to trimming the seam after sewing to prepare for the flat felling. Once I worked out how to line up the pattern pieces this method worked quite well.
This shot shows the slim fit of the shirt. I really liked this pattern and will be sure to use it again. These photos were taken in a rush as he was about to leave for the seven hour drive. I didn't have time to wash out all the pink pencil marks on the shirt so I hope he copes ok with that. I gave him a quick ironing lesson the other night, as he will have quite a bit of ironing to do this year. Nice to know that although he is much smarter than me, I can still teach him something.
Happy sewing
Jean


