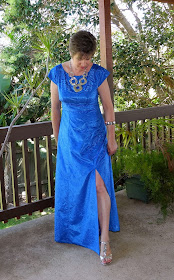
I decided to go the extra mile and stretch my sewing skills while making this dress. I opted to include the front split, although I chose quite a conservative length to be more age appropriate. (I kinda wish I made it a little bit higher now, because it is hardly even noticeable unless I stick my leg right out).
The bodice is completely lined which eliminated those annoying facings and I used french seams on the skirt panels.(This is the first time I have sewn french seams). I hand stitched the hems on the front split and I also hand stitched the seam allowances down on the centre back seam (because this seam had to be pressed open due to the invisible zip). I also hand stitched the hem on the skirt and the bodice lining at the sleeve edges and the waist line.
Here are some closer details:
 |
| Front tucks match skirt seams |
 |
| Invisible zip with hook and eye at the top. |
 |
| Bodice lining |
 |
| Inside back bodice and skirt. |
 |
| Inside side front showing seam with split. |
 |
| Hand stitched hem on front split. |
 |
| Hand stitching seam allowance down on centre back seam. |
This is how I did my french seams on the skirt panels:
 |
| Sew seam, fabric wrong sides together. Use width of presser foot as a guide. |
 |
| Trim off half of seam allowance. Press seam allowance to one side. Open out fabric and fold back over seam allowance and press. |
 |
| Sew seam again (using width of presser foot as a guide), this time with right sides of fabric together and seam allowance encased in seam. |
I have already worn my "Cocktail Outfit" to my work Christmas Party and it was a hit. I received some lovely compliments, and had a fabulous time. Hope you are all having a happy festive season, and are managing to squeeze some sewing in too.
Happy Sewing


A stunning dress and thanks for all of the how to details. Great post.
ReplyDeleteThanks for you kind comments BeaJay. I try to be helpful because I always appreciate these details in other bloggers' posts.
DeleteOMG!!! That is just absolutely gorgeous ~ just love that fabric, and it is a perfect fit on you ... J
ReplyDeleteThank you Judith. I bought this fabric on a complete impulse as soon as I laid eyes on it. In fact, I had to go back and get another metre the following week because I didn't have enough, and I was stressing that there would be none left.
DeleteYour dress is lovely and so is your blog! I can't believe I haven't seen it before. You have made some lovely outfits and I really like the photo of you and your sisters at the wedding - great colours together.
ReplyDeleteThanks so much Summer Flies. I am fairly new to this blogging thing, but I am really enjoying it so far.
DeleteSo gorgeous! The dress ... and you in it! (Love your necklace too!)
ReplyDeleteThanks Debbie. I thought it needed a statement necklace, and Rockman's were having a half price sale on all their costume jewellery.
DeleteStunning! The color is just wonderful on you and the necklace really jazzes it up! I've finally bought this pattern and can't wait to make one and join the fun!
ReplyDeleteThanks Carrie. I thought the necklace was well suited and this blue seems to be my colour. Looking forward to seeing your version of Anna.
DeleteThat is beautiful!
ReplyDeleteThank you Beverly for your lovely comment.
DeleteVery classy cocktail dress and love the colour!
ReplyDeleteThanks Sharon for your very kind words.
DeleteBeautiful! Outstanding craftsmanship.
ReplyDeleteThank you Cennetta. I did try to go the extra mile with this dress, but my poor fingers were so sore after all the hand sewing. I think I need a thimble.
Deletevery glad to see your version. I just ordered the pattern the other day, and am more looking forward to it now. your dress is very well made!
ReplyDeleteThank you Cozy Cotton. Looking forward to seeing your version.
DeleteHow beautiful you look and what a stunning colour! You should be so proud. Not a wonder you have received so many comments. Congratulations. Cheers, Karen
ReplyDeleteThanks for your very kind comments, Karen.
DeleteYou've made such different dresses from this pattern, both look lovely, no wonder you attracted compliments. The blue is gorgeous on you.
ReplyDeleteThanks for your lovely comments kbenco. That's one of the great things about this pattern...it's so versatile. Many different versions can be created using different fabrics, lengths and necklines. There are even instructions on how to add sleeves in the sew along.
DeleteWhat a gorgeous party dress!!!! And Thank You for your detailed post - I do love reading them ;) Very nice work!
ReplyDeleteThanks so much MaciNic. I just checked out your blog and what a coincidence...I am right in the middle of making my own Moss Mini and have just realised the waistband is too short. Your post reassured me that it was not something I had done wrong. Thanks for that. Now to find a solution...
Delete