Pages

Saturday, 28 December 2013

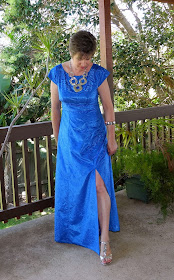
My Blue Anna Party Dress

I needed wanted to make a party dress to wear to my work Christmas Party this year. Luckily, this coincided with the Cocktail Outfit Contest on Pattern Review and I had just stumbled upon this gorgeous blue flocked taffeta at my local Bargain Box fabrics. Recently, I had completed my Floral Anna Maxi, and I wanted to try this pattern in a completely different fabric, so everything just kind of fell into place.


I decided to go the extra mile and stretch my sewing skills while making this dress. I opted to include the front split, although I chose quite a conservative length to be more age appropriate. (I kinda wish I made it a little bit higher now, because it is hardly even noticeable unless I stick my leg right out).


The bodice is completely lined which eliminated those annoying facings and I used french seams on the skirt panels.(This is the first time I have sewn french seams). I hand stitched the hems on the front split and I also hand stitched the seam allowances down on the centre back seam (because this seam had to be pressed open due to the invisible zip). I also hand stitched the hem on the skirt and the bodice lining at the sleeve edges and the waist line.


Here are some closer details:


Front tucks match skirt seams
Invisible zip with hook and eye at the top.
And now for the gory details:


Bodice lining
I attached the bodice lining to the neck line and invisible zip as shown in this tutorial from Sewaholic. This makes a nice neat finish. I also under stitched the bodice lining at the neckline to stop it rolling out.


Inside back bodice and skirt.
Inside side front showing seam with split.
Hand stitched hem on front split.
Hand stitching seam allowance down on centre back seam.
I made a few more changes to the By Hand London Anna Dress pattern from my floral version. I used the same bodice with the alterations I had already made, then changed the neckline from the V neck, to the slash neckline. I lowered the neckline by 4cm at the centre front, curving it back to the original line at the shoulder seams. I also took out a wedge of 2cm across the back just above the waistline, tapering to nothing at the side seams. (My floral Anna was a bit too long at the back).

This is how I did my french seams on the skirt panels:


Sew seam, fabric wrong sides together. Use width of presser foot as a guide.
Trim off half of seam allowance. Press seam allowance to one side. Open out fabric and fold back over seam allowance and press.
Sew seam again (using width of presser foot as a guide), this time with right sides of fabric together and seam allowance encased in seam.
I found this method worked out perfectly with 1.5cm or 5/8th an inch seam allowance. Although my presser foot is slightly less than half the seam allowance width, this allows for turn of cloth.


I have already worn my "Cocktail Outfit" to my work Christmas Party and it was a hit. I received some lovely compliments, and had a fabulous time. Hope you are all having a happy festive season, and are managing to squeeze some sewing in too.

Happy Sewing

Tuesday, 3 December 2013

The Madeline Dress Modelled

A few weeks ago I made the Madeline Dress by Wink Designs for my grand daughter's third birthday and I promised a photo of her modelling it after her birthday.

Well, my dear daughter in law has emailed me 20 photos from the photo shoot. Here are the best ones:


I am Three
This is the front
This is the side
This is the back
Hands on hips pose
It has pockets
And here are some action shots:


I think she liked it.

Hope you all enjoyed these photos as much as I did.


Happy Sewing

Sunday, 1 December 2013

Floral Anna Maxi


After seeing Sew Busy Lizzy's Anna Dresses from By Hand London, I was sold on this pattern. You can see her versions here First Anna , Second Anna , Third Anna. I bought the pattern but then it sat unused for quite a while because I couldn't find the ideal fabric I had pictured using. I traced off size US10/UK14 from the shoulders down to the bottom of the armhole and then graded up to a size US12/UK16 at the waist. I cut the skirt at size US12/UK16 because I didn't want it to be tight across the tummy region.


Photo of Pattern envelope.
Eventually I found this fabric on the Lincraft Online Store. As you can see, the photo of the fabric was very blurry so I was taking a bit of a risk ordering it. However, I was very happy with the print when it arrived. The spun rayon is ideal for this pattern. It's so soft and drapes beautifully to create a very feminine dress. It was OK to sew, but keeping the pins in the fabric was a bit of a nightmare.

I did make a muslin of the bodice to check fit as I had read that a lot of people had trouble with the neckline gaping. I'm so glad that I did because it was easy to adjust the pattern to eliminate the gaping. I used this tutorial by Ginger Makes to adjust the back neckline, and then I used the same process to eliminate the gaping at the front neckline as well. I pinched out 2cm at each side of the back neckline and 1.5cm at each side of the front neckline. I also stay stitched the neckline as soon as possible after cutting to avoid the fabric stretching during handling.


No neckline gaping
This dress is super long. I cut off 9cm from the length and I am wearing this with very high heels. (I'm 5' 7"). 


The neckline is finished off with facings as instructed in the pattern. These are not interfaced and are very floppy. I under stitched to try and avoid them rolling out. (This is not mentioned in the instructions). They do suggest top stitching but I didn't want that look for this soft feminine dress. I also anchored the facings to the shoulder seams with a few hand stitches to keep them in place. This method has been successful.


Closer view of front bodice pleats
Back neckline and invisible zip.
I didn't add the thigh high split to this dress so it made construction a little simpler. I finished off all the seams with my overlocker in a cream coloured thread which I felt was quite neat, as they would not be seen at all while wearing the dress. I simply turned twice and top stitched narrow hems on the sleeves and the skirt.


I hope this railing doesn't break.
This fabric was a bit transparent so I wore a nude coloured slip underneath.


I added my denim jacket (store bought) for warmth as it was a little chilly tonight. I think it gave the dress a nice casual vibe.


Credit for these lovely photos all goes to my very patient partner who actually specializes in Wedding Photography. You can see his work here Photique Photography.

In closing, I must share what happened after these photos were taken. We went into town for dinner at one of our favourite restaurants. As the waitress seated us she complimented me on my dress. When I told her that I made it myself she was genuinely amazed and gushed about how pretty and feminine it was. This really made my night. I guess that's just one of the rewards of sewing your own clothes. So satisfying.

And, by the way this is not the last you will be seeing of this pattern. I have the next one cut out already...but this next one will be quite different.

Happy Sewing

Sunday, 24 November 2013

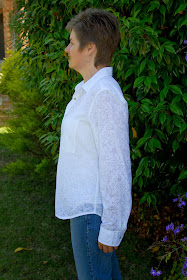
Button Up Shirt for Me

After my foray into sewing for others "The Birthday Shirt" and "The Madeline Dress", I have gone back to selfish sewing and made myself a button up shirt. This is a make I have had on my list for quite a while now, but haven't quite had the confidence to start.


I used the Archer Shirt Pattern from Grainline Studio. I was inspired by so many other Archers out there in blog land. Check these out PinterestGoogleFlickr. So many shirts for inspiration. I chose to make View A. The pattern has a collar and separate collar band, a back yoke, a pleat in the centre back, a separate button band, pockets, long sleeves, angled cuffs and a continuous cuff placket.


I chose a lovely sheer cotton/poly voile in white which I purchased online from The Remnant Warehouse and it is still available. I love this fabric. Although it is very lightweight, it was easy to sew and pressed beautifully and it feels very soft and floaty to wear.

Although I did follow the Archer Sew Along which was great, I still found myself referring back to the Craftsy Class "The Classic Tailored Shirt". This class had so much more detailed instruction and I would thoroughly recommend it to anyone new to sewing button up shirts.


Front view (worn with a white tank top underneath for modesty)


Side View (Notice the huge sleeves)


Back view

I sewed a straight size 12 which was the correct size for my bust measurement. This shirt is loose fitting, but the sleeve proportions are ridiculous. I have long arms yet these sleeves are way too long and full and the cuff circumference was huge. No wonder so many reviewers had said they used a smaller sleeve size.


Oh dear, sleeves are too long.
Angled cuff detail
Back yoke and pleat
I sewed the seams on my sewing machine (note this pattern has 1/2 inch seam allowances) and then overlocked the seam allowances together with my overlocker, pressed to one side and then top stitched. This gives the look of flat felled seams without all the work. I did consider doing french seams, but with the 1/2 inch seam allowances, and french seams being a new technique for me, I chickened out.

Front detail and close up of fabric.
After reading Art Attack's blog about one of her Archer's, she inspired me to try "snaps" instead of buttons. I ordered the Snapsetter tool and snaps from SnapSource.com. I was very impressed with this company. The website is very easy to navigate and place an order. It took two weeks exactly from placing the order to receiving the order on my doorstep (that's USA to regional Australia). So this is the first garment I have tried them on and I am very happy with the result.


I'm sure I will be sewing more Archer's down the track.


Happy Sewing

Monday, 4 November 2013

The Madeline Dress by Wink Designs

My eldest Granddaughter is turning 3 at the end of this month and I have had my eye out for a simple toddler dress pattern that would be suitable to make for her as a gift. Initially, I purchased Simplicity 2265 in the recent pattern sale on Pattern Review. After having a closer look at it and reading some reviews, I realised there was quite a lot of work in making it, plus I was not going to be able to do any fittings during construction, as she lives a 6 hour drive away from me.

Then I spotted The Madeline Dress by Wink Designs.  Blogless Anna was a pattern tester and made a very cute "Madeline Dress" for her daughter. I was smitten with the cuteness of it and I checked out Wink Designs Etsy Shop straight away. Wink Designs is a small pattern maker based in Sydney Australia, who sells her PDF patterns for little girls through her Etsy shop.


Photo by Wink Designs

I just loved the sweet little peter pan collar, the simple bodice, the buttons at the back, the cute pockets with the contrasting pocket flap and the fullness of the gathered skirt. This was just what I was looking for. So here is my version.

Front
Based on my Granddaughters measurements (taken during her last visit a few weeks ago) I cut a size 2 bodice and I lengthened the skirt to the size 3. I purchased this polycotton fabric from Bargain Box Fabrics. I love the bright and cheerful colours.

Back
The PDF Pattern was very easy to put together and each size was in a different colour, making it very easy to trace the correct size. There is a size chart (based on body measurements), instructions on how to assemble the PDF pattern, a fabric guide and a cutting layout. The instructions were clear and easy to follow and included some line drawings and a photo to illustrate the construction steps. The only problem I had was cutting out the main fabric. The recommended yardage was not enough to fit all the pattern pieces on. I overcame the issue by adding a contrasting strip across the bottom of the skirt. This was cut from the recommended yardage for the contrast fabric. Anyway, I quite like the contrasting band on the skirt. It ties in the collar and the pocket flaps.

Contrasting Peter Pan Collar

Buttons and buttonholes on the back of the bodice.

Pocket with contrasting pocket flap.

Contrasting band on skirt hem with top stitching.

The bodice is fully lined with contrasting fabric.

Inside back of bodice with button closure.
There was no interfacing used in this dress. The instructions suggest putting interfacing in the collar if preferred, but said it wasn't necessary. When I make this dress again, I think I will interface the area under the buttonholes. They feel a little fragile without interfacing.

Inside of skirt.
I over-locked (serged) the raw edges inside the dress to neaten them and the hem is simply turned up twice and top stitched.

I hope my Granddaughter will love this dress as much as I do. Hopefully I will update this post with a photo of her modelling the dress after her birthday.


Happy Sewing