Showing posts with label Shirts. Show all posts

Saturday, 3 March 2018

Country Blue Houndstooth Fairfield Button-Up Shirt


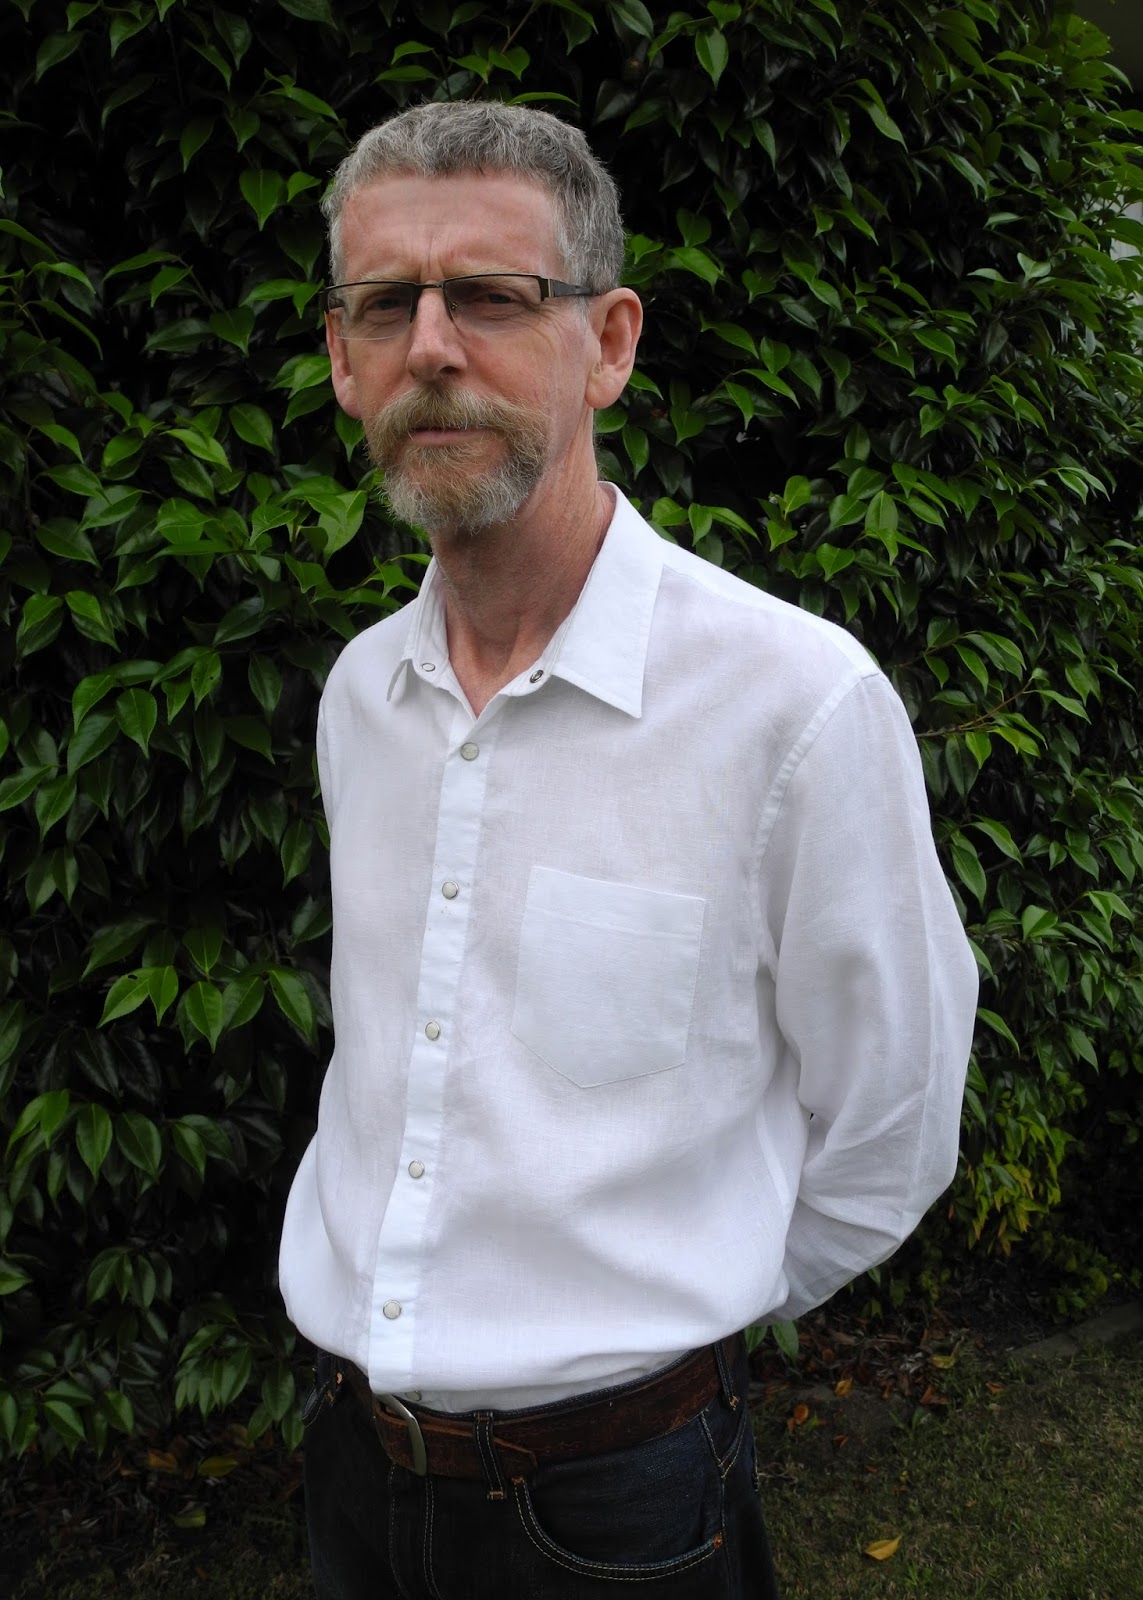
My son received my second version of the Thread Theory Fairfield Button Up Shirt in the mail yesterday, (you can see my first version here), and he graciously sent me photos so I could see how it fitted.


For this version I went up a size as the first version was a little snug, (luckily still wearable, as it was made in a stretch poplin). I cut a size Medium grading down to a small below the chest. He is quite slim, but has very broad shoulders. I also lengthened the sleeves by 2.5 cm (1 inch) and lowered the button/buttonhole placement by approximately 1.25cm (1/2 inch).


The fabric is called Country Blue Houndstooth shirting from The Remnant Warehouse. It is a poly cotton blend which pressed well but tended to pucker a little when sewing which was a little annoying and made it difficult to get a great finish. I don't know why I don't learn as I had a similar, but worse experience with a polycotton gingham way back in 2014 (by the way, that shirt has had a lot of wear, and is still a favourite in my wardrobe).


I did remember to take a few photos of the shirt before posting it, so here are a few closer shots of the details.


After discussing the fit with him over the phone, the only other change I would make for the next one is to raise the pocket placement by a couple of centimetres, as he felt it was a little low. I'm so glad it fitted well and the changes I made were an improvement on my first version. Now I should be able to make future versions knowing that they will fit without worry.


He was probably way out of his comfort zone asking a fellow student to take these photos for me, hence the absence of a smile, but I am forever grateful.

Now back to some selfish sewing...a dress for me.

Happy Sewing

Jean

Sunday, 28 January 2018

Thread Theory Designs: Fairfield Button-Up

My two youngest offspring.

My youngest son returned to Medical School yesterday, to begin his second year of study. He will be based at Shepparton Hospital in Victoria, this year, and will be required to wear doctor appropriate clothing, five days a week. I have been promising to sew him a shirt for ages, so I finally thought I had better make good on that promise, especially now that he has a genuine need for decent button-up shirts.

Thread Theory Designs Fairfield Button-Up

The pattern I used was the Thread Theory Design Fairfield Button-Up shirt. I ordered the printed pattern through Pattern Review and was amazed at how quickly it was delivered to me in regional NSW Australia. It comes packaged in a lovely cardboard sleeve. Inside is the multi sized pattern printed on tissue paper. There are pattern pieces for average figures, as well as fuller figures, and also a comprehensive and well illustrated instruction booklet. I also found the online Sew-a-long very helpful.

Thread Theory Design Fairfield Button-Up
I cut a size small, grading down to an extra small for the waist and hips, based on my son's measurements. I also cut a medium length in the body and the arms. My son wanted a fairly slim fitting shirt and that is certainly what he got.


Luckily I used a super stretch cotton poplin from The Remnant Warehouse which has quite a bit of stretch, as the shirt is a little too narrow across the shoulders. As the fabric stretches, it is wearable, but I will size up for the next one. If I had made this in a non stretch fabric, it would have been too uncomfortable to wear.


I didn't make any design changes to the shirt and sewed it up exactly as instructed. The front button band is not a separate piece, which reduces bulk and I really like how it turned out. Not sure if I love the pocket design, but it turned out ok. Apparently Thread Theory Designs offer some alternative pocket designs that can be downloaded for free. I will have to look into this for the next one.


The pattern includes all the usual features of a typical men's shirt including tower plackets. I have had terrible trouble in the past with fusible interfacings that bubble, so I decided to use a sew in interfacing for this shirt, and had much better results. I interfaced the sleeve plackets too as I was concerned that the stretch fabric might be too easily distorted when sewing these. I'm quite pleased with how they turned out. I skipped adding the extra button half way along the placket, as this shirt will most probably be worn with the sleeves rolled up most of the time.


Sleeve tabs are also included in the pattern. This is a handy feature as I just said: the sleeves will be rolled up most of the time. The sleeve length was a little short, despite cutting the medium length, so I will lengthen the sleeves a couple of centimetres for the next one.


The pattern was unusual in that the pattern pieces were cut already graded for the flatfelled seams. This took a bit for me to get my head around, as I am used to trimming the seam after sewing to prepare for the flat felling. Once I worked out how to line up the pattern pieces this method worked quite well.


This shot shows the slim fit of the shirt. I really liked this pattern and will be sure to use it again. These photos were taken in a rush as he was about to leave for the seven hour drive. I didn't have time to wash out all the pink pencil marks on the shirt so I hope he copes ok with that. I gave him a quick ironing lesson the other night, as he will have quite a bit of ironing to do this year. Nice to know that although he is much smarter than me, I can still teach him something.


Happy sewing

Jean

Monday, 12 June 2017

Grainline Studio Archer #3...The Floral Version

I finally completed my 3rd Grainline Studio Archer Button Up Shirt towards the end of May. You may have seen it in action during Me Made May.


I started this shirt back in April, but my husband had an accident while out on a mountain bike ride, fracturing his pelvis. He spent four days in hospital and then required a lot of help at home to do just about everything. Needless to say, my sewing had to be put on the back burner for a few weeks. Glad to say he has recovered well and is now back at work.


I made this version with the same adjustments as I made for my 2nd version. This time I avoided using a poly cotton blend, and chose this pretty Japanese Lawn (Cluster Floral Pink) 100% cotton, from Spotlight.


I'm wearing it here with my Style Arc Elle Pants in Denim look stretch bengaline, also from Style Arc. The cotton lawn was a dream to sew and pressed beautifully. I didn't have any of the issues I had with my second version.


It was really hard to photograph this pretty fabric as the light is so harsh at this time of the year. I'm really happy with the shape and fit of the shirt.


Instead of buttons, I used these pretty pink snaps that I had in my stash. They were such a good match and I love how they turned out. I only had nine of them, and I needed 8, 6 for the front and 1 for each cuff. I managed to wreck the first one by trying to install it upside down, so the pressure was on to not make anymore mistakes.


All the top stitching was done in white thread. I did add a little extra width to the side seams and arm seams, when cutting out, so that I could do proper flat felled seams.


I love how flat felling makes the inside look as neat as the outside. It's well worth the effort even if it is a bit fiddly sewing down the length of the sleeve.


I found it works out fine if you take it slowly and let the fabric bunch up behind the foot as you go along. I'm really happy with how this Archer turned out and I have worn it a few times already. All the photos were taken by my husband down at our local beach.


 While I was scrolling through Facebook the other day, I stumbled upon a funny coincidence. This add popped up for a new movie "The Shack" and I couldn't believe my eyes when I saw the actress was wearing my shirt. I'm sure it is the same fabric. 


Happy Sewing

Jean

Wednesday, 1 February 2017

Style Arc Elsie Woven Overshirt in Polka Dots


Style Arc Elsie Woven Overshirt 
I have made the Style Arc Elsie Woven Overshirt. It's hot off the sewing machine last night and worn to work today. The perfect shirt for our unseasonably cool day of 20 degrees Celsius, compared to the day before yesterday when we experienced 43 degrees. 

Style Arc Elsie Woven Overshirt
From the Style Arc Website: This square shaped shirt features the trendy reverse revere, patch pockets and roll up sleeves. A must have shirt in your wardrobe for all seasons.


I made a size 12 without any alterations. The fabric is a navy and white polka dot rayon purchased from Spotlight back in November last year. Being rayon, it has a lovely drape which tones down the boxyness of this shirt, as described by Style Arc. However, it was a nightmare to cut and sew.


I decided to take my time, and sew in shorter stints over several days, to reduce the frustration. I was able to start each time with renewed enthusiasm. There was a bit of unpicking and resewing as that rayon seems to have a mind of it's own, but I'm glad I persevered and I am pleased with the result...not perfect, but good enough.


I am wearing it today with my Style Arc Elle Pants in navy stretch bengaline. These were made back in 2014 and are starting to look a little shabby. Must be time to make some more.


The Elsie has some lovely details. I particularly love the reverse revere collar. I used a lightweight fusible knit interfacing from Spotlight in the bands and cuffs, which worked very well with the rayon. I decided not to add the patch pockets as the rayon was a bit sheer and the polka dots showing through the pockets was not a good look. 


There is a box pleat at the centre back which creates the loose fit. The yoke is unlined, and does feel a little flimsy in the rayon. This could easily be remedied in any future makes.


The high low hem and side splits are very on trend and I love the backside coverage it provides. The hem was simply overlocked and turned up 1cm and top stitched (mitred corners). I did stabilise the edge with Bondaweb before top stitching and it helped a lot. Next time I would add to the hem to allow it to be turned up twice as it would give a much nicer finish.


I followed these instructions to sew the binding on the sleeve slits, which was excellent. Style Arc's instructions are really just an order of construction. I feel that they got this a little out of order, sewing the sleeve binding after the sleeve had been sewn to the body of the shirt and the side seams sewn. This was quite difficult, but would have been much easier if done while the sleeve was flat. So do step 11 after step 8 and before step 9.


One issue I did have with the Elsie while wearing it today, was that the sleeve tabs kept falling out of the sleeve slits. They do seem to be unnecessarily long...something I will change in the next one.


Overall, I am loving my new Elsie Woven Overshirt and I can see it going with several other garments in my wardrobe too.

Happy Sewing

Jean

Sunday, 22 November 2015

White Linen Shirt

After promising my dear husband that I would make him another handmade shirt months ago, I have finally delivered.


Last March, my ever patient husband took me on a fabric shopping trip during a visit to Sydney. I got to visit Tessuti at Surry Hills which was amazing...such beautiful fabrics. I could have spent hours there, but this was only a quick trip. I did manage to purchase a couple of pieces of lovely 100% linen and one of them has been made into this shirt.


I based this shirt on McCalls 6044 which I have made twice before here and here. You can find all the construction details and pattern alterations in these previous posts so I won't go over them in detail again here.


For this version, I only added one pocket at Greg's request. This simplified things as I didn't have to worry about matching the placement to the other side. Also, using a solid colour meant no pattern matching. This shirt was probably a lot easier to sew than my first two versions because of this and the fabric was a dream to press and sew.


I followed The Classic Tailored Shirt by Pam Howard on Craftsy, as I did with my previous shirts. This is a great resource and I can't recommend this class enough. I added a tower placket that is not included in the pattern using this tutorial. I love this detail on a man's shirt. Greg loves wearing his sleeves rolled up so I lengthened the tower placket to make it easier for him to roll up the sleeves.


I had all intentions of sewing button holes and buttons on this shirt, but I couldn't find any buttons I was happy with locally. Greg is a big fan of press studs and I had these "Snaps" from Snapsource in the stash. At first I didn't like the idea of using snaps on a linen shirt but after some convincing from Greg, the idea grew on me. These ones are called white marble and I think they go quite nicely with the casual rumpled vibe of the linen fabric.


There is something so satisfying in sewing a man's shirt. I love the neat finish that flat felled seams produce, both on the outside and the inside. I spent a couple of weeks sewing this shirt in short bursts in the evenings after work and I managed to get it finished just in time for his birthday. I gave it a wash to remove the pink pencil marks so it was presentable for the occasion, but to my horror the interfaced areas went all bubbly and crinkled looking. I thought it was ruined, but after getting over the initial disappointment I have decided it doesn't look too bad with the wrinkly nature of the linen and it is wearable. Greg didn't seem concerned about it.


I have learned my lesson though. No more cheap and nasty interfacing for me. I have explored Fashion Sewing Supply and their interfacing products online. Has any one else in Australia bought interfacing from this supplier? I would appreciate any feedback or any suggestions for a more local suppler of decent interfacing. It is so heart breaking to have all your hard work ruined by inferior products.


I couldn't get a smile out of him for these photos. We were out in our front garden and he was worried someone might see him. Oh the trials and tribulations of getting photos for the blog. He did love his new shirt though, and I get a lot of pleasure seeing him wear it.

Happy sewing.

Saturday, 24 January 2015

Maria Denmark's Edith Blouse: A Wearable Muslin

After admiring the Edith Blouse and Dress out there in blogland, I have finally had a go at making my own. I loved Paola's dresses at La Sartora here and here and Heather's blouse from Handmade by Heather B here. Let's just call this a wearable muslin.


This is a PDF pattern, but I must say the pattern tiles fitted together much better than any other PDF patterns I have tried. My only gripe being that you have to add your own seam allowances. I found this just another tedious step that certainly added a lot of time to the process. You have to print the pattern, tape it together, trace off the required size and then add seam allowances. I don't understand why they are not added in the first place. Imagine how many hours are wasted if you added up the time it takes each individual person to complete this extra step, when it could have been included in the pattern. As you can probably tell, I was very annoyed.

Anyway, getting back to the blouse...the style really appealed to me. Fitted, but not overly fitted and no sleeves to set in. I thought this would make a great blouse to wear to work.


I thought I would start with the blouse to get the fit sorted, before I tried the dress. I bought some cheap pink poplin from my local Bargain Box Fabrics specifically for this and I cut a size B42 with 1.5cm seam allowances. I did add 5cm extra length at the hemline because I prefer to wear my tops a little longer. After sewing all the darts (8 in total) I decided I would just machine baste the shoulder and side seams to check the fit. I am so glad that I had the forethought to do this because it sure made the unpicking a lot less painful. This size was way too small. I don't know what I was thinking when I cut this size. Maybe I was thinking it would be like the Big Four patterns which have loads of unnecessary ease. I almost binned it at this stage until I realised I had added quite generous seam allowances so maybe it could be saved. I proceeded, with a new determination to make it fit.


After unpicking the basted seams, I scooped out about a cm from the bottom of the armhole as these were very tight. The shoulder seams were re sewn with a scant 6mm seam allowance which effectively added another cm of room to the length of the blouse. I decided to finish off the sleeve hem with some purchased bias binding. (I didn't have enough fabric to make matching bias binding). I did this step before sewing the side seams. The curve at the bottom of the armhole is quite tight and I thought this would be quite difficult to attach the bias binding in the round. Then I sewed the side seams with a scant 6mm seam allowance, effectively adding another 4cm of room to the width of the blouse. I was careful to line up the seam evenly at the underarm to create a nice neat finish. To stop the seam allowance peaking out at the underarm, I fold the tail of the overlocking threads under the seam allowance and then stitch the seam allowance down for about a cm to keep everything in place.


Another quick try on and I decided I could definitely make it wearable. This is actually quite an easy blouse to sew. None of the techniques required are terribly hard and I was enjoying the sewing process. I attached the collar and the facing and all was looking good. I must have started to rush as I could see the end in sight...a bit like a horse bolting for home, because I got careless. 


I was grading and clipping the seam allowance after attaching the facing...snip snip snip *#%@! I had snipped two little slits in the back of the blouse. I had invested too much time and effort into this blouse to abandon it now. What to do??? The slits were right at the top of the back of the blouse, almost covered by the collar on the outside and totally covered by the facing on the inside. My solution was to iron a small circle of fusible interfacing over the slits on the inside. So far they have held together and it has been through the wash twice now.


I made the buttonholes as close to the edge of the front as possible and positioned the buttons to provide as much room as possible. When sewing the hem I curved it up at the side seam. I thought this would look more flattering than a straight hem all the way around. The fit is still a little too close. The bust darts are too high but it's passable...a wearable muslin.

I have a renewed enthusiasm to try this pattern again. Notes for next time: 

  • Cut the larger size
  • Add 2cm length to blouse by cutting and spreading approx halfway between shoulder seam and top of front darts. (Do this to front, back and facing pattern pieces).This will do two things: lower the darts by 2cm and add an extra 2cm to the armhole depth.
  • Add 3cm of length at the hemline.
  • Curve hemline up at side seams.


Looking forward to making a much better fitting Edith soon.

Happy Sewing