Thursday, 26 February 2015

Maria Denmark Edith in Blue

As I was rushing out the door on my way to work this morning, I managed to talk my darling husband into putting on his photographer's hat and taking a few shots of my third attempt at the Maria Denmark Edith Dress


You can read about my earlier attempts here and here. As the saying goes "third time's the charm". I am really happy with both the fit and the fabric for this one.


The fabric was purchased locally at Patchwork on the Bay. It is a lovely soft 100% cotton chambray. The colour is a lovely blue with black undertones. The bright blue threads can be seen along the selvedge. This was a lovely fabric to work with. It sewed and pressed beautifully... a very well behaved fabric which certainly added to the pleasure of sewing.


My pattern alterations can be seen much clearer in this version with the plain fabric. It was rather difficult to see the details of dart placement etc in my second version with the jungle inspired print.


I only had 2.5 metres of this fabric (112cm wide) so I had to piece the self made bias binding together to finish off the kimono sleeves. This worked out fine and I'm glad I went to the extra effort to do this.


I found these blue buttons at the same shop that I purchased the fabric from. They are a perfect match and the shop owner even threw in an extra button, no charge, as it was the last one left in the tube. This could come in handy if I ever lose one. Love the service at Patchwork on the Bay. I did some research on which direction button holes should be sewn and I discovered that garments with a button band usually have vertical buttonholes as there is not enough room to make horizontal buttonholes. That made complete sense to me, but this dress doesn't have a button band, it has a generous facing that allows plenty of room for horizontal buttonholes. I thought horizontal buttonholes would be safer...less likely for any wardrobe malfunctions if the buttons are put under any strain.


I have had some fun accessorising with different coloured necklaces and scarves to change the look. I think the blue is a little plain on it's own and benefits from a splash of contrasting colour. Very happy with this one!

Happy Sewing

Wednesday, 25 February 2015

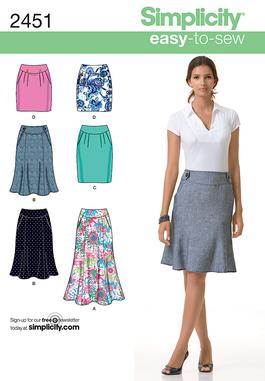
The Skirt Experiment (aka Simplicity 2451)

I have been deliberating about whether to do a post about these skirts for quite a few weeks. However, this blog is about documenting my sewing journey and that includes everything, not just the things I am really happy with. I'm sure we all have those disappointing moments when things don't work out quite as we had planned.

I have had Simplicity 2451 in my pattern stash for a while now, purchased from Pattern Review during one of their great pattern sales.

 There are 74 reviews of this pattern on Pattern Review and it has been quite popular, so I had high hopes.

Simplicity 2451 View B
My mother had given me this beige fabric (of unknown composition - probably some sort of synthetic with a nice drape) that she had originally purchased to make a pair of pants. It had been stored for several years and had a few areas damaged by mildew, but I was able to cut the skirt out without using the damaged areas of fabric. I traced off a size 14 and graded the waist up to a size 16. This is where I went wrong. The waist is actually a bit roomy and doesn't hold any tummy bulge in, yet the fit is too tight in the hips, causing some unsightly wrinkling.


The fit across my behind is way too tight for my liking revealing the lines of my underwear. I used an invisible zip instead of a lapped zip as the pattern instructs and I do like the curved yoke in place of an actual waistband. I skipped the decorative side tabs as I always intended to wear this skirt with a longer top, so they would never be seen.


I also like the flared shape of the skirt. It feels quite swishy. After taking these photos I unpicked the side seams and made a bit more room across the hips.


I also made view C with the same pattern alterations.

Simplicity 2451 with Maria Denmark blouse
This style fitted much better through the hips but was a bit loose at the waist.

Simplicity 2451 View C
I purchased this fabric from the discounted shelf at my local Bargain Box fabrics for $5.00 a metre. It is a fairly loosely woven cotton that unfortunately bags out in the seat after a few hours of sitting.

Pockets and pleats almost invisible in this print.
Although it is very difficult to see in this print, I stitched the pleats down for approximately 3 cm so they didn't cause too much poofiness. I have enough natural poofiness in this area.

Back of View C
Again, I used an invisible zip and there is a vent in the back as well, which makes it comfortable and practical.

Although I have been a little disappointed in both these skirts, I have learned quite a bit, and I would like to try making this pattern again. I just need to remember that the waistline in this skirt is quite generous and does not need grading up. Also, View B is very fitted in the hips/upper thigh area and I may need to add some width here. Fabric choice also has a significant effect on the resulting fit and loosely woven fabrics are not suitable for fitted skirts. Now, onto some more successful sewing.


Happy Sewing

Thursday, 19 February 2015

Knit Scout for Camping Weekend

I have some knit fabrics languishing in my stash that really need to be made up into comfy T-Shirts. Inspiration struck when I saw what Christy had made, using the Grainline Studio Scout Woven Tee pattern. This pattern is designed for woven fabrics but works equally well in knit fabrics. I needed a nice comfy T-shirt for our Valentine's Day Camping Weekend.

Roast lamb cooking in the camp oven for our Valentine's Day dinner.

This is my sixth Scout Tee, but the first time I have used a knit. I have previously tweaked the fit to suit my figure and you can read about the changes I made here.To compensate for the extra stretch, I sewed the seams at 5/8" instead of 1/2" as the pattern instructs. The only other change I made was to lower the neckline at the centre front by 5cm.

Scout Tee in a knit with neckline lowered.
The fabric is some sort of cotton jersey with no spandex. It was quite stable with a slight stretch and not very good recovery. I used a scrap of cotton/lycra jersey to bind the neckline. I turned this completely to the inside and secured with twin needle stitching. All other hems were stitched with a twin needle. I like the rtw finish this gives as it looks similar to a cover stitch on the right side. 

I love the loose fit that hides all the lumps and bumps.
This T-shirt was very comfortable to wear and I don't know why it has taken me this long to try it in a knit. I can see myself making a few more of these. I might tweak the shape of the neckline and cut it a bit wider for the next one.

Deua River
We had  a lovely camping weekend on the banks of the Deua River. Despite some rain, we also had beautiful sunshine and warm temperatures and went swimming in the river a couple of times. The water was freezing, but very refreshing.

The view from our camp kitchen.

Deua River in the morning sunshine.
After having a break from sewing over the weekend I am keen to get back into my sewing room. I have quite a few projects lined up.

Happy sewing

Monday, 26 January 2015

An Edith Dress for Jungle January

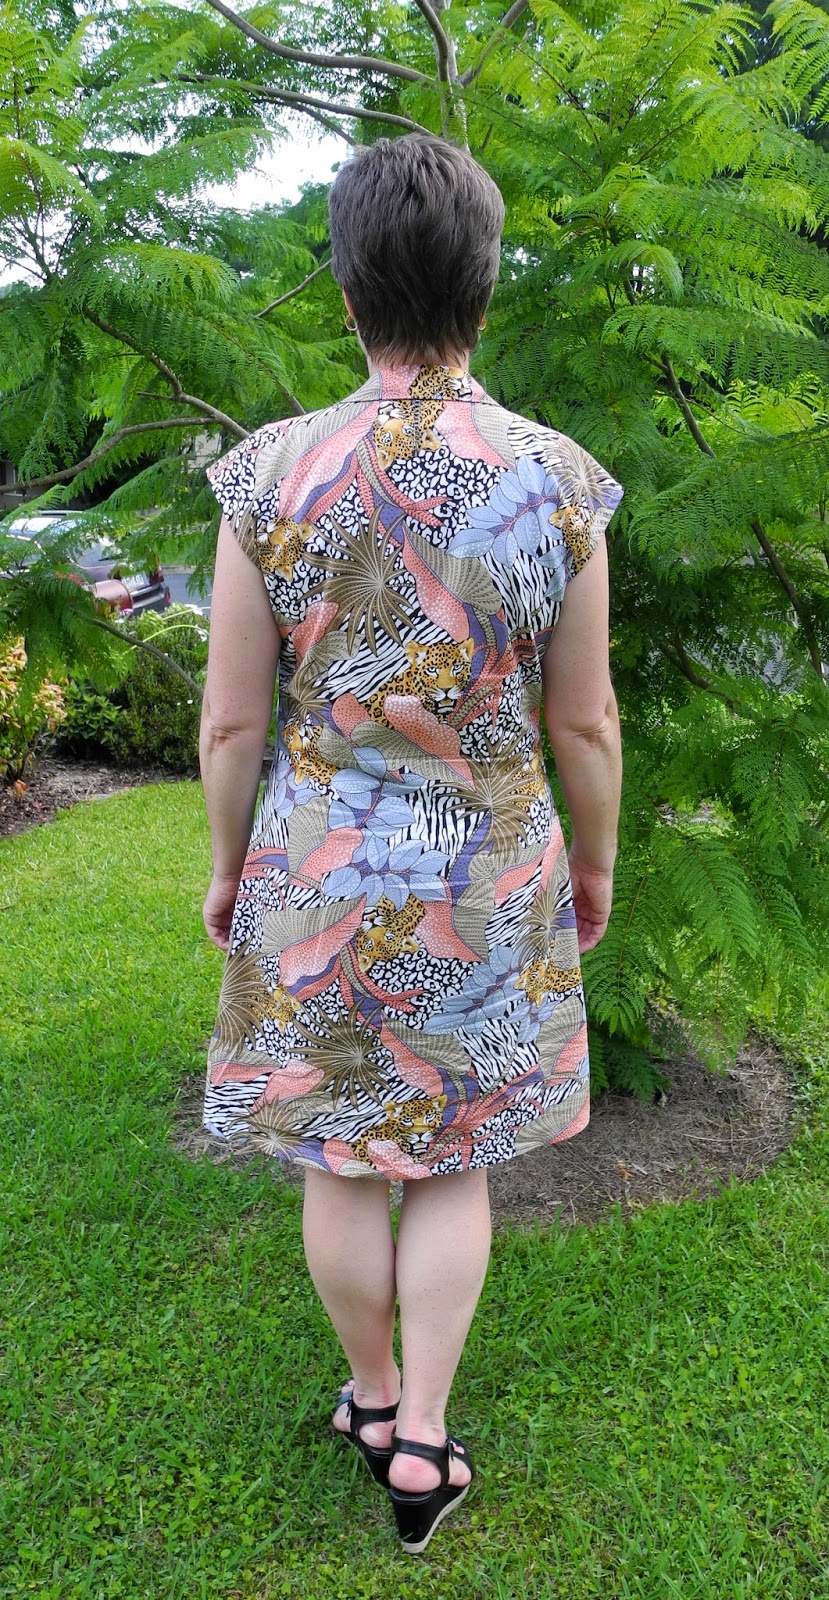
After my initial attempt at the Edith Blouse and Dress pattern by Maria Denmark here I was enthusiastic to try again with a few changes. I purchased a jungle inspired print from the bargain shelf at my local Bargain Box Fabrics for only $5.00 per metre. It was some sort of cotton? I think, with a lovely drape. Perfect for Jungle January.


As I noted after making the blouse, I made a few changes to the pattern. Firstly, I retraced the pattern in the bigger size B44 ( and added 1.5cm seam allowances). I hope I didn't mislead people in my last post regarding the sizing of this pattern. I think the pattern corresponds well to the sizing chart, I was just in denial about my actual size. As a side note regarding fabric requirements, Maria only provides fabric requirements for 140cm wide fabric. I used 112cm wide fabric and I cut the blouse easily out of 1.5m and the dress out of 2.5m. (This did not allow for making bias binding).


In order to address the issues of the bust darts being too high and the armholes being too small I did a very simple alteration to the pattern pieces. I simply slashed the pattern horizontally above the bust darts and through the armholes and spread it by 2cm.


I also cut off 7cm at the hemline to allow the hem to finish above my knee. 


I am really happy with the fit now. 


Sorry about the wrinkles but these photos were taken after wearing the dress all day at work.


I did have enough fabric to make some bias binding to finish off the sleeves. 


The darts at the back shoulder create a nice fit.


I used white thread for the construction and top stitching. I did think about using black thread to sew the buttonholes because I was using black buttons, but I am glad I went with white as they are quite unobtrusive and disappear into the print of the fabric.


I turned the hem up 1.5cm twice and top stitched. This is a really comfortable dress and I am so glad I tweaked the fit to make it work for me. Well worth the effort.

This jungle print is certainly something I wouldn't normally wear...not really my colours, but I am pleased with the finished result. I already have another Edith cut out in a completely different fabric for a totally different look, and I have a few more blouses planned as well.


It has been fun to participate in Jungle January too.

Many thanks to my daughter for taking these photos for me.


Happy Sewing

Saturday, 24 January 2015

Maria Denmark's Edith Blouse: A Wearable Muslin

After admiring the Edith Blouse and Dress out there in blogland, I have finally had a go at making my own. I loved Paola's dresses at La Sartora here and here and Heather's blouse from Handmade by Heather B here. Let's just call this a wearable muslin.


This is a PDF pattern, but I must say the pattern tiles fitted together much better than any other PDF patterns I have tried. My only gripe being that you have to add your own seam allowances. I found this just another tedious step that certainly added a lot of time to the process. You have to print the pattern, tape it together, trace off the required size and then add seam allowances. I don't understand why they are not added in the first place. Imagine how many hours are wasted if you added up the time it takes each individual person to complete this extra step, when it could have been included in the pattern. As you can probably tell, I was very annoyed.

Anyway, getting back to the blouse...the style really appealed to me. Fitted, but not overly fitted and no sleeves to set in. I thought this would make a great blouse to wear to work.


I thought I would start with the blouse to get the fit sorted, before I tried the dress. I bought some cheap pink poplin from my local Bargain Box Fabrics specifically for this and I cut a size B42 with 1.5cm seam allowances. I did add 5cm extra length at the hemline because I prefer to wear my tops a little longer. After sewing all the darts (8 in total) I decided I would just machine baste the shoulder and side seams to check the fit. I am so glad that I had the forethought to do this because it sure made the unpicking a lot less painful. This size was way too small. I don't know what I was thinking when I cut this size. Maybe I was thinking it would be like the Big Four patterns which have loads of unnecessary ease. I almost binned it at this stage until I realised I had added quite generous seam allowances so maybe it could be saved. I proceeded, with a new determination to make it fit.


After unpicking the basted seams, I scooped out about a cm from the bottom of the armhole as these were very tight. The shoulder seams were re sewn with a scant 6mm seam allowance which effectively added another cm of room to the length of the blouse. I decided to finish off the sleeve hem with some purchased bias binding. (I didn't have enough fabric to make matching bias binding). I did this step before sewing the side seams. The curve at the bottom of the armhole is quite tight and I thought this would be quite difficult to attach the bias binding in the round. Then I sewed the side seams with a scant 6mm seam allowance, effectively adding another 4cm of room to the width of the blouse. I was careful to line up the seam evenly at the underarm to create a nice neat finish. To stop the seam allowance peaking out at the underarm, I fold the tail of the overlocking threads under the seam allowance and then stitch the seam allowance down for about a cm to keep everything in place.


Another quick try on and I decided I could definitely make it wearable. This is actually quite an easy blouse to sew. None of the techniques required are terribly hard and I was enjoying the sewing process. I attached the collar and the facing and all was looking good. I must have started to rush as I could see the end in sight...a bit like a horse bolting for home, because I got careless. 


I was grading and clipping the seam allowance after attaching the facing...snip snip snip *#%@! I had snipped two little slits in the back of the blouse. I had invested too much time and effort into this blouse to abandon it now. What to do??? The slits were right at the top of the back of the blouse, almost covered by the collar on the outside and totally covered by the facing on the inside. My solution was to iron a small circle of fusible interfacing over the slits on the inside. So far they have held together and it has been through the wash twice now.


I made the buttonholes as close to the edge of the front as possible and positioned the buttons to provide as much room as possible. When sewing the hem I curved it up at the side seam. I thought this would look more flattering than a straight hem all the way around. The fit is still a little too close. The bust darts are too high but it's passable...a wearable muslin.

I have a renewed enthusiasm to try this pattern again. Notes for next time: 

  • Cut the larger size
  • Add 2cm length to blouse by cutting and spreading approx halfway between shoulder seam and top of front darts. (Do this to front, back and facing pattern pieces).This will do two things: lower the darts by 2cm and add an extra 2cm to the armhole depth.
  • Add 3cm of length at the hemline.
  • Curve hemline up at side seams.


Looking forward to making a much better fitting Edith soon.

Happy Sewing

Wednesday, 21 January 2015

Casual Coco for Summer

I have recently made a wonderful discovery locally...a new to me source for fabric and sewing notions..."Patchwork On The Bay". I had never paid this shop any attention as it is tucked away down a very quiet arcade. Out of sight and out of mind, and I assumed it would be all patchwork/quilting fabric and supplies. But I was wrong! They also stock some wonderful cotton shirting fabrics as well as a large selection of buttons and trims, etc. The business owner is also very helpful. (More than I can say for the other fabric/sewing shop in town). There is a bargain table out the front where I have picked up some lovely knits...mainly interlocks and that is where I found this lovely print for my Coco.


I just loved the fresh colours in this striped print and I thought it would make a lovely summer Coco dress. I made a size 5, as usual and kept the flared A-line skirt. I shortened the sleeves and added some width to make them nice and loose. After wearing my last Coco, I found the short sleeves restricted movement a little. This may have been due to the ponte which is quite different from this interlock. I may have gone overboard on the sleeve widening but they are very comfortable and cool.


I did a pretty good job on matching the stripes on the side seams. Unfortunately, I didn't have enough fabric to match the stripes on the sleeves, but I don't think they look too bad.


I don't know the composition of this fabric, except that it does not contain any spandex. It drapes well and does not crease. Got to love a dress you don't need to iron. Most of the construction was done on the overlocker.


I turned up 2cm hems on the sleeves and the skirt and sewed with a twin needle. I had white thread in one needle and navy blue in the other. This was largely due to sheer laziness as I didn't have another reel of white thread and couldn't be bothered to stop and wind a bobbin. I thought the navy thread would tie in nicely with the navy print.


I used a cotton/lycra knit binding on the neckline, turned completely to the inside and top stitched with a twin needle. This resulted in a neckline that sits flat and snug against the body, thanks to the lycra component.


A casual Coco perfect for relaxing on the weekend.


Many thanks to my darling husband for taking these photos for me, and many thanks to my Mother and her husband for the use of their pretty garden. 


Happy Sewing

Sunday, 18 January 2015

White Snake Foile Print Maxi (aka McCalls 6552)

As usual, I made myself a new dress to wear to my work Christmas Party last month. I was a little strapped for time, so I chose a simple pattern McCalls 6552 (unfortunately now OOP), which I have made before here and here


Taken at Circular Quay just before boarding the boat for our dinner cruise on Sydney Harbour (my 2014 work Christmas Party)
This is a versatile little pattern that can be dressed up for a glamorous party or dressed down as a beach cover up, depending on your fabric choice. It can be made in a knit or a woven fabric too. The bodice front and back are cut as one piece (that's right, there are no shoulder seams). I would recommend this pattern to a beginner as it is quite simple to sew and easy to fit.
McCalls 6552 Line Art
I am usually a size 14 to 16 in the big four patterns, but as I was using a knit, I cut a size Small as I had done for my previous versions. The fabric was purchased online from The Remnant Warehouse. A White Snake Foile Print Jersey, (which is still available). I really had no idea what to expect when I ordered this fabric. It was a bit of a surprise when it arrived. The colour is very close to the photo on the website but it didn't feel like I had imagined. The print is an almost plastic feeling layer on the fabric. I was worried that it might feel like wearing a raincoat. Luckily the wrong side of the fabric feels just like a poly jersey. Due to the print layer, this fabric had very little stretch, which made my dress a little snug and I wished I had cut the larger size.


This version ended up a little short compared to my last maxi. I had added 4cm to the length, but I hadn't realised that I hadn't actually added the extra length to my traced pattern piece. Never mind, it made a feature of my pretty new shoes (and I avoided a trip hazard).


I eliminated the drawstring at the waist and replaced it with some 12mm wide elastic inserted in the casing. This made a comfortable and snug fit which did not need constant adjustment and worked very well. I felt that the dress looked a little unfinished so I made a long sash to wrap around and cover the elastic casing. This was a long rectangle, approx 300 cm long by 22cm wide, folded in half longways, right sides together, and stitched along the length and across one end and then turned right side out. I then tucked in the raw edges on the open end and stitched closed. This is long enough to wrap around me twice.


I finished of the neckline with a knit binding turned completely to the inside. As the Foile Print fabric did not have very much stretch, I used some white cotton/lycra left over from my recently made white T shirts. This resulted in a nice snug neckline without any gaping. As this is a very low cut dress, I wore a white rtw petticoat underneath.


I sewed french seams for the bodice side seams as they are visible inside the kimono style sleeves. The overlocker was used for the other seams. I turned up a very small hem and stitched with a twin needle. This would be a great candidate for Jungle January, if I hadn't sewn it in December.

Many thanks to my darling husband for taking these photos for me today, and many thanks to my Mother and her husband for the use of their pretty garden. (Mine is an overgrown mess at the moment, due to all the rain and heat we have been having lately, and me spending all my spare time in my sewing room.)

Woops! I almost overbalanced and fell in the pond.

Happy Sewing