Thursday, 30 April 2015

Me-Made-May '15

I can't believe it's almost May already. I participated in Me-Made-May '14, last year for the first time and really enjoyed it, so I have decided to join in again this year.

It's a great way to document your wardrobe and see what is working and what is not. Last year I found it very useful as a tool for evaluating my wardrobe and identifying areas that needed attention. It was also a huge boost to my sewing mojo which I'm hoping will happen again this year.

Here is my pledge:

'I, Jean of http://sewjeanmargaret.blogspot.com.au/, sign up as a participant of Me-Made-May '15. I endeavour to wear as many Me Made garments as possible each day for the duration of May 2015'

Over the last year or so, I seem to have expanded around my waistline. This has been a gradual weight gain due to the onset of middle age, generally over eating and laziness. It has got to the stage where a lot of my Me Made clothes have become uncomfortably tight around the middle...some even unwearable.

I have been feeling very fat and frumpy lately, but struggling to find the motivation to do something about it. So I thought I might use Me-Made-May '15 to not only wear as many Me Made garments as possible each day, but to motivate me into eating more healthily and exercising, so that by the end of May I can fit more comfortably back into my Me Made clothes. Daily photos will keep me accountable and provide the motivation I need.

I will post once a week with photos of my daily outfits and I will be joining the Me-Made-May '15 Flickr Group.

Looking forward to sharing and following along with everyone else who has joined in this year.


Happy Me-Made-May '15

Sunday, 26 April 2015

Style Arc Adele Tunic in Stripes


Recently I had the unexpected opportunity to visit The Remnant Warehouse in Sydney. I have bought quite a bit of fabric from their online store in the past, so it was great to actually visit the real shop for the first time. It was during this visit that I picked up this lovely cotton lycra stripe in a soft grey and white. They had precut bundles of this fabric in one metre lengths for $5.00. I bought two bundles and used it to try out the Style Arc Adele Top.


Style Arc Adele Tunic

I made a size 12 and the only alteration I made was to the shape of the neckline.


I took my time to match the stripes at the side seams. I could have constructed this entirely on the overlocker but I knew my stripes would never line up if I did this. So I used a very narrow zigzag on my sewing machine and my walking foot and lots of pins. This worked really well and I am glad I took the extra time and effort.


I love the fit of this tunic. There is negative ease across the bust and shoulders, but then it falls loosely over the tummy and hips, effectively hiding any lumpy bits. I am wearing this tunic with my Style Arc Elle Pants.

Neckline borrowed from the Sewaholic Renfrew
 
You may have noticed that my neckline is quite different from the pattern illustration. I am not a fan of crew necklines on me, so I redrew the neckline using the Sewaholic Renfrew View B with the V neckline, and I followed the Sewaholic instructions for the construction of the V neckline.


There is a side split on one side which assists with the fit over the hips. I am more rectangular shaped, so I probably could get away without the side split, but this would be great for those of you who are more pear shaped.


I love the asymmetrical hemline too. I think it is very flattering and helps elongate and slim the torso. I used a twin needle to sew all the hemlines. I wanted to use some Steam a Seam Lite to stabilize the hems before stitching but my local supplier was out of stock, so I forged ahead very carefully, using my walking foot. The result wasn't too bad but there is some tunneling.


Loving my new Adele Tunic which has been worn three times already. I will be making more of these when I can find the right fabric.


Happy Sewing

Sunday, 5 April 2015

Style Arc Laura Easter Dress

Style Arc Laura Dress
Finally I have got to make the Style Arc Laura Dress. This pattern has been around for quite a while and there are lots of versions out there on the inter webs for inspiration.

Style Arc Laura Dress

Style Arc recommend any knit fabric with plenty of stretch. I decided that I knew best and used a very bright floral printed scuba knit for the main part of the dress and an off white ponte for the yoke and sleeves. Both of these fabrics were purchased from Spotlight. I cut a straight size 12 (my usual size in Style Arc patterns).


Unfortunately, I ignored the "plenty of stretch" in Style Arc's fabric recommendation. You may have noticed that my dress has short sleeves. This was a necessary modification mid sew, due to the lack of stretch in my chosen fabric. Originally I did cut the long sleeves, but they were so uncomfortably tight in the forearms, that they made the dress unwearable. 


There is a centre back seam with some shaping for a nice fit. I finished off all the hems with a twin needle for a neat finish. I used a binding on the neckline as instructed, but my fabric was too bulky to fold over and stitch in the ditch. I ended up turning the binding completely to the inside and securing with a twin needle. This did give a nice neat finish.


The front doesn't drape as nicely as it should, if it had been made in a knit with more stretch (and drape) as recommended, I'm sure it would look less maternity. Maybe I could add a couple of darts in the front to reduce the volume? I'm open to suggestions if anyone has any bright ideas.


Hope you are all having a Happy Easter break, and getting to spend some time in your sewing rooms.

Happy Sewing

Monday, 30 March 2015

Refashion using the Scout Tee

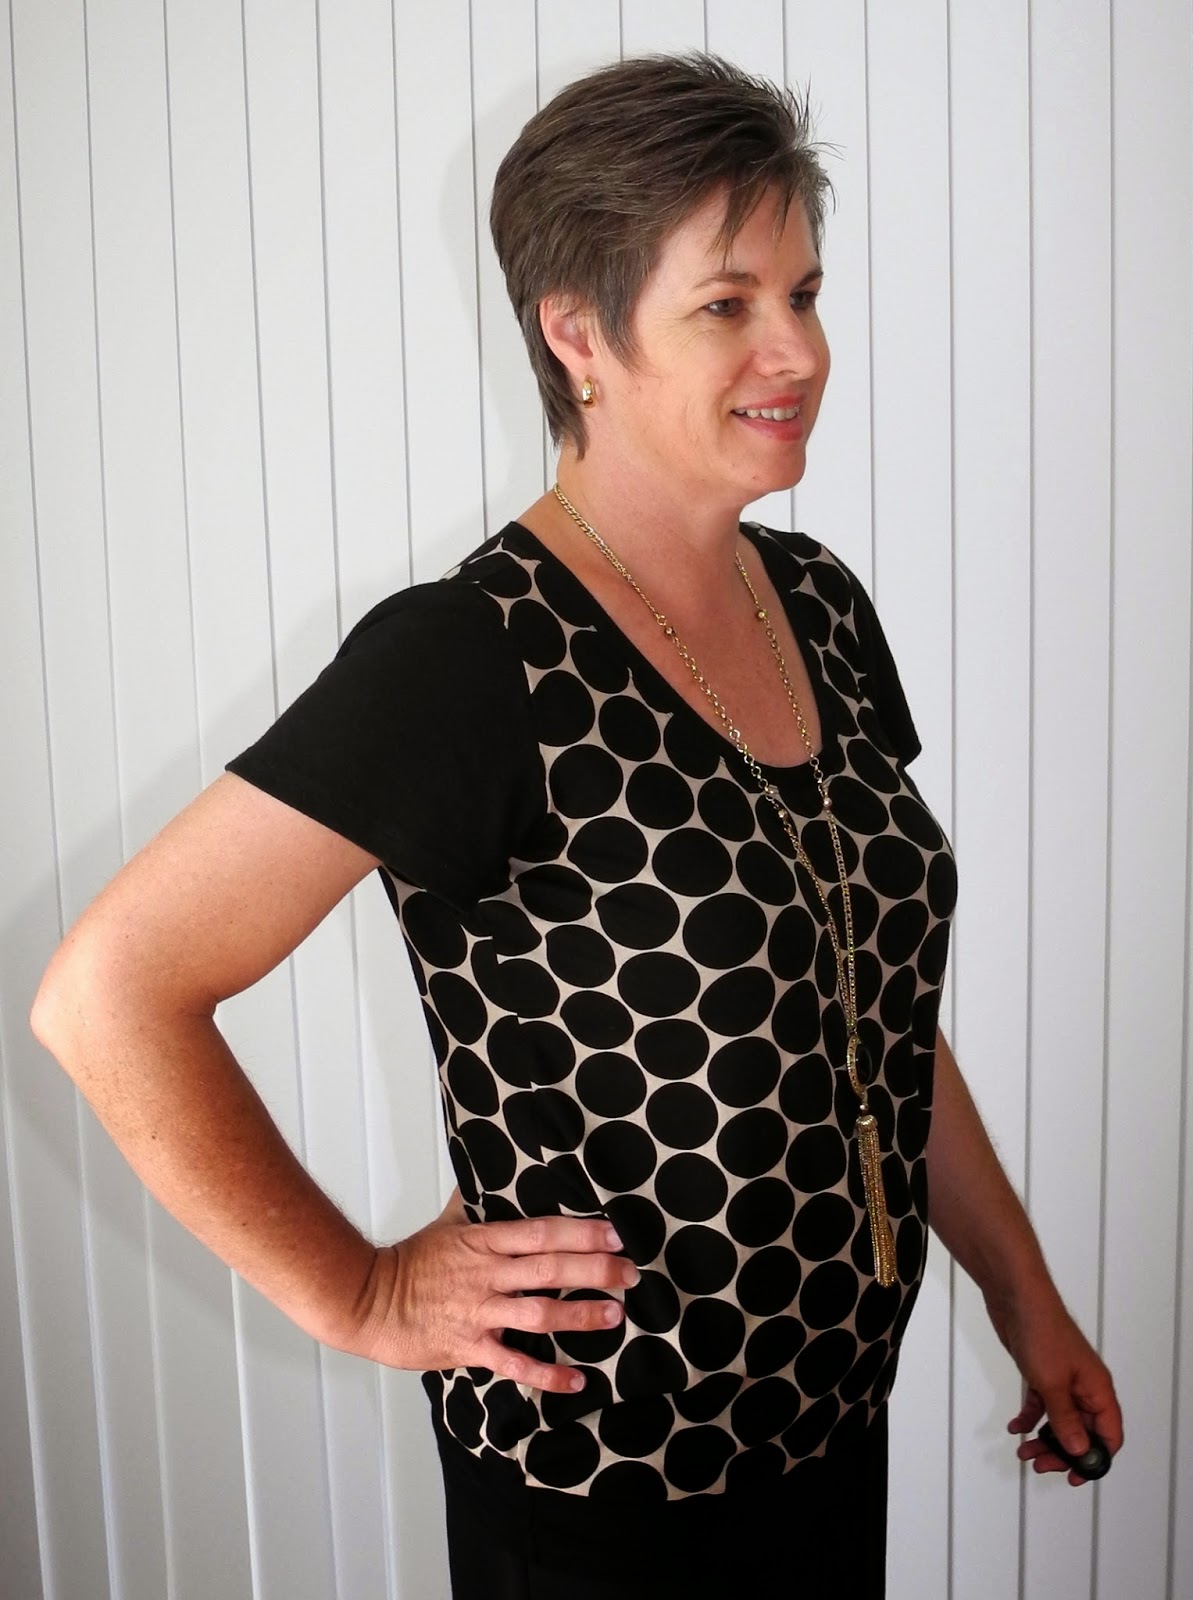
I have made another Grainline Studio Scout Tee, this time with a difference. This fabric had a life as a completely different garment before it came into my possession.


My very generous friend gave me a bag of clothing to go through before sending it to the goodwill. I found this tunic/dress made from a beautiful silky viscose with a lovely drape.

Original rtw garment
The armscyes were huge and not bra friendly.
The fabric felt lovely so I decided to make a top out of it. Using the Grainline Studio Scout Tee pattern as a base, I managed to refashion this tunic into a much more wearable garment.

Front and back cut on fold. I reshaped the neckline.
I eeked enough fabric from the black shoulder straps for the neck line binding, but I didn't have enough fabric for the sleeves. Luckily there was another plain black T-Shirt in the bag that provided the perfect fabric for the sleeves.


Unfortunately, there was not enough fabric to pattern match the side seams. I did make sure to centre the black spots on both the centre front and centre back.


I opted to keep the black band around the bottom of the top, as it was in the tunic. This created a neat fit at the hips, allowing the fabric to drape loosely around the body.


This has been a useful addition to my wardrobe and it feels good to breathe new life into an otherwise unwearable garment.


Happy Sewing

Tuesday, 24 March 2015

Style Arc Ginger Knit Top and Sara Skirt


Style Arc would have to be my favourite pattern company. Their designs are very fashion forward, they tend to fit my body shape fairly well with minimal alterations required, and they are Australian.

I loved the Ginger Knit Top as soon as I saw Lara's version, but I was quite surprised that there was very little mention of this top around the sewing blogosphere. The loosely fitted shape, the crossover front and deep V neckline appealed to me.

Style Arc Ginger Knit Top

This was fairly simple to sew although, as with all Style Arc patterns, the instructions were brief. They did include several illustrations that were most helpful for the tricky bits. I think I struggled most with sewing the shoulder pleats.


I purchased this lovely Paisley Jersey from Style Arc as well. It really is as lovely as it is described on the website...beautiful quality and amazing drape. I did sew the front neckline approximately 2cm lower than the pattern markings (I usually have issues with necklines looking higher on me) but this is a little low and I may go back and sew that extra bit to raise the depth of the V slightly.


I used a twin needle to sew the sleeve hems and the back hem. The back neckline is finished off with an inside binding.


The one issue I did have with my top was that the wrong side of the fabric was hanging lower at the front hemline from the under layer of the crossover, thus making it visible. This maybe due to me stretching out the diagonal edge of the crossover when I overlocked it. In the photo above of the inside of the front, you can see where I have removed a wedge of fabric from the under layer to fix this problem.

Style Arc Sara Skirt

The Style Arc Sara Skirt is one of their older patterns. It is a very simple straight skirt with 8 waistline darts, centre back zip and kick pleat. The waistline is finished off with a facing and the pattern includes a lining.


I used a Stretch Bengaline in Sailor, also purchased from Style Arc. The pattern was designed for a woven fabric, so I did have to make some fit alterations. I cut a size 14, but this ended up way too big with the stretch of the bengaline. I ended up sewing 2.5cm seam allowances for the side seams. I also took a little fullness out of the side seams at hip level to achieve a better fit. To give the skirt a more flattering shape, the side seams were pegged in at the hemline a further 2.5cm. I was concerned that the waistline might stretch out with wear so I sewed some cotton tape in the seam when I attached the facing to the waistline, to stabilize it. This version is unlined because I didn't have any suitable lining fabric on hand.


This stretch bengaline from Style Arc is good quality. The skirt has retained it's shape really well, despite me sitting in it all day at work...no bagging out in the seat. The hem has been hand stitched for an invisible finish. The Sara Skirt is a great basic skirt pattern that I'm sure I will be using over and over. I already have another one cut out in a Black Stretch Bengaline. These will be ideal basics to add to my work wear wardrobe.


Happy Sewing

Thursday, 5 March 2015

Style Arc Lani Woven Tunic

I was immediately smitten with the recently released Style Arc Lani Woven Tunic.

Style Arc Lani Woven Tunic
The interesting design lines and the flattering shape was the draw card. I made up a straight size 12 (which is my usual Style Arc size) without any alterations.  I am wearing them with my Style Arc Barb's Stretch Pants made in Style Arc's stretch bengaline in midnight, which I have yet to blog.


In reality, this is not the figure flattering shape I was expecting. My tunic turned out a bit boxy, but to be fair, this may be due to my fabric choice. I used a lovely soft 100% cotton shirting, in a super fine check called sage, purchased from my new favourite local fabric shop...Patchwork on the Bay. Style Arc recommend linen, silk or any soft woven. I'm pretty sure the fabric I used would be classed as a soft woven, but it may have been a bit lightweight. I think this pattern would be best suited to a fabric with a bit more weight and drape so that it doesn't stand away from the body.


The interesting design lines can be seen a bit clearer in the photo above. I top stitched all the decorative seams to highlight them. There is a pocket inserted into the angled seam on the right hand side. The asymmetrical hemline at the front is a nice feature. It is a little tricky to get those corners mitred neatly but after taking my time I am happy with how they turned out. 


There is an armhole dart on the left hand side to add some shaping. Although the instructions are very brief there were several diagrams that were of great assistance in working out how all the pieces were to be joined together. I did deviate from the instructions, and sewed the sleeves in flat. They fitted the armscye perfectly without having to use any gathering stitches.


A lot of the decorative seams are cut on the bias so I took extra care not to stretch these edges before sewing. Sorry about the wrinkles, but I took these photos this afternoon after I had worn it to work all day.


The neckline is finished with a facing and it sits beautifully. My only gripe is that it is much higher than the illustration leads you to believe.


There are no closures required on this tunic. It slips on easily over your head.


Although I am a little disappointed in the overall look of my tunic, I am really pleased with the level of finish that I achieved. This pattern is a little challenging and was quite satisfying to sew. I might try this one again in fabric with more drape one day.

Happy Sewing

Thursday, 26 February 2015

Maria Denmark Edith in Blue

As I was rushing out the door on my way to work this morning, I managed to talk my darling husband into putting on his photographer's hat and taking a few shots of my third attempt at the Maria Denmark Edith Dress


You can read about my earlier attempts here and here. As the saying goes "third time's the charm". I am really happy with both the fit and the fabric for this one.


The fabric was purchased locally at Patchwork on the Bay. It is a lovely soft 100% cotton chambray. The colour is a lovely blue with black undertones. The bright blue threads can be seen along the selvedge. This was a lovely fabric to work with. It sewed and pressed beautifully... a very well behaved fabric which certainly added to the pleasure of sewing.


My pattern alterations can be seen much clearer in this version with the plain fabric. It was rather difficult to see the details of dart placement etc in my second version with the jungle inspired print.


I only had 2.5 metres of this fabric (112cm wide) so I had to piece the self made bias binding together to finish off the kimono sleeves. This worked out fine and I'm glad I went to the extra effort to do this.


I found these blue buttons at the same shop that I purchased the fabric from. They are a perfect match and the shop owner even threw in an extra button, no charge, as it was the last one left in the tube. This could come in handy if I ever lose one. Love the service at Patchwork on the Bay. I did some research on which direction button holes should be sewn and I discovered that garments with a button band usually have vertical buttonholes as there is not enough room to make horizontal buttonholes. That made complete sense to me, but this dress doesn't have a button band, it has a generous facing that allows plenty of room for horizontal buttonholes. I thought horizontal buttonholes would be safer...less likely for any wardrobe malfunctions if the buttons are put under any strain.


I have had some fun accessorising with different coloured necklaces and scarves to change the look. I think the blue is a little plain on it's own and benefits from a splash of contrasting colour. Very happy with this one!

Happy Sewing