Monday, 21 March 2016

Vogue 8805 in Black and White


Vogue 8805
I purchased this pattern in the recent pattern sale at Spotlight and I was keen to try it out. There are loads of positive reviews on Pattern Review so I felt confident that this pattern would work out well.


Vogue 8805 Line Drawing

I made the long sleeve version with some changes. The fabrics I used were from my stash and had been purchased with other plans in mind, but have worked out well for this pattern. The black fabric is a ponte from Knitwit and the black and white print is a scuba knit from Spotlight. I decided not to follow Vogues order of construction, and construct the back and front of the dress separately so I could sew the side seams last, and adjust the fit as required.


I cut a size 16 which I did think might be a bit big but I wanted to be safe. In hindsight, I could have cut a size 14 as I had to sew 2.5cm seam allowances for the side seams. The back slit opening was eliminated by cutting the yoke on the fold and I removed 2cm from the entire neckline to ensure it would be large enough to fit over my head. I did away with the neckline facing purchased bias binding finish and used a self fabric binding instead.


When cutting out I added 5cm to the length of the lower panels. After trying the dress on during construction I felt that the proportions of the panels were wrong. The middle panels just looked too long. Lucky I had added the extra length to the lower panels, as I was able to remove them, cut 5cm from the length of the middle panels, and reattach the lower panels. The proportions looked so much better with this small change.


The seams joining the contrasting panels were top stitched to hold the seam allowances down nice and flat and add some visual interest. The bust dart worked out in the correct position without any changes. Normally bust darts are too high on my mature figure. Vera was a fabulous help with fitting this dress. She has been such a useful addition to my sewing room and the cost has been quickly forgotten.


This is how I wore the dress to work today. It has been the first real Autumn work day since our late run of summer temperatures. It won't be long before I will be wearing this dress styled with tights, boots and a scarf. Have you started sewing for the new season yet?

Happy Sewing

Sunday, 28 February 2016

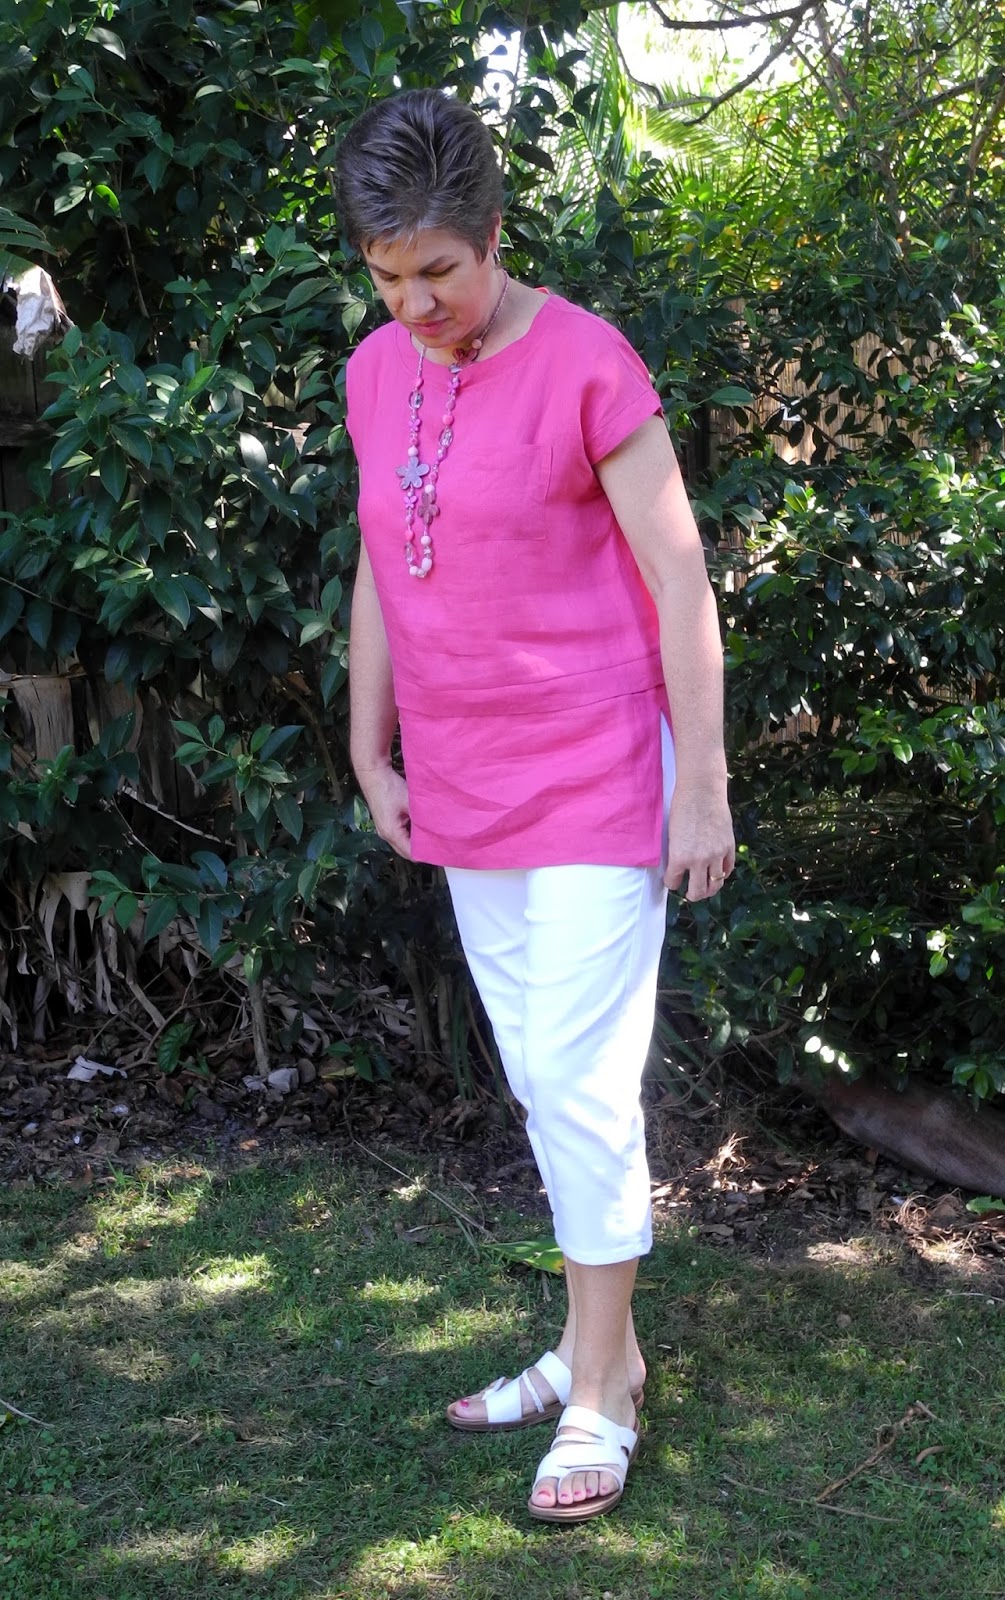
Style Arc Lu Lu Tunic in Hot Pink Linen


Style Arc Lu Lu Tunic
The Style Arc Lu Lu Tunic has been languishing in my pattern stash for quite a while. I don't know why it has taken so long to get around to sewing this up. Now that I have made it I can say that I am quite pleased with how it turned out. I used this light weight linen purchased from Tessuti at Surry Hills about a year ago, during my first and only visit to this lovely fabric shop.

Style Arc Lu Lu Tunic
I cut my usual size 12 in Style Arc which worked out fine. I did lengthen the bodice by 5cm, which I later removed as it turned out way too long (This turned out to be much harder than it should have been). The pattern was perfect as it was. I did make a couple of other changes to simplify the construction process: The back bodice was cut on the fold and the back slit and button and loop closure were eliminated. The neckline opening is quite big enough to get the top on and off without any trouble.


The other change I made was to construct the neckband and sleeve bands as instructed, however I attached them simply by overlocking both the raw edges to the openings which worked beautifully. As the bands are 2cm wide there is plenty of width to hide the overlocking. Much less fiddly than attaching each layer separately and stitching in the ditch, as instructed.


To be honest, I could not make head nor tail of the instructions for the band at the bottom of the bodice. I found the written instructions and the instructions on the pattern pieces to be contradictory and I really had to scratch my head for a while. I ended up deciding to cut a pair of both the front and back bands and then treated them the same way as the sleeve and neckline bands. I sandwiched them between the bodice and lower skirt sections and overlocked all the layers in one go. Sounds simple if you do it correctly. Unfortunately I attached the band inside out so the the side with the under stitching (flat stitching) showed. Out came the seam ripper. All turned out well the second time.

Pocket and band details
The mitred corners on the skirt pieces were very well drafted and came together very well. I wore my new tunic to work the day after I completed it with my purple ponte Colette Mabel skirt, but it kept getting caught up on my hips and just felt too long. So...out came the seam ripper again, and I removed the skirt and the waist band and trimmed off 4cm of length from the bottom of the bodice. I then reattached the waistband and the skirt pieces back to front. The skirt was longer at the front...not a good look. So out came the seam ripper again.


I think I made the construction of this tunic much harder than it needed to be...anyway I'm sure the next one will go together without any silly mistakes.

Happy Sewing

Tuesday, 23 February 2016

Introducing Vera...my new sewing assistant and my knock off of Vogue 1179

Vera, my body double

I have recently splurged and bought a new dress form or dressmaker's dummy. There has been lots of research undertaken over several months for a replacement of my fully adjustable Project Runway dress form that broke a while ago. Although it had been a much appreciated gift from my husband, I could never get it to mimic my shape. By the time the waist had been expanded to match my waist measurement, the hips were all distorted and weirdly shaped. It was too light weight and unstable and broke during a simple outfit change.

After reading several favourable reviews, I settled on the The Shop Company Dress Form with collapsible shoulders located in the USA. I chose a size 12 which was smaller than my measurements, as it is not adjustable, it has to be padded out to resemble my shape. You can add, but you cannot take away. I also ordered The Fabulous Fit System which was also available from The Shop Company at a heavily discounted rate when purchased with a dress form.


The Shop Company Dress Form
The Shop Company does not ship to Australia, however they give instructions on how to organise shipping to Australia here.

This has been a very extravagant and expensive purchase...(it can be dangerous to be left home alone for hours on end over the Christmas break, with internet access and a credit card at your disposal), but one I have not regretted, thankfully.

There were a few anxious weeks while I waited for delivery. There was a hold up with The Fabulous Fit System, which held up the whole order. Once shipped by My US it arrived on my doorstep within 4 days...can't complain about that. The shock was when I checked my credit card account and realised that I forgot to factor in the current terrible exchange rate. Although the actual cost of the dress form was very reasonable, the addition of the freight to My US and then the freight on to Australia, the cost was blown right out with the adjustment for the exchange rate. I'm a little embarrassed to say that this new dress form cost me just over $1000 Australian dollars delivered to my door. 

Once it arrived I couldn't wait to get started on padding it out to resemble myself. However, this was quite a confronting process and you have to be brutally honest with yourself. I did get a good laugh from Anne of Pretty Grievances reading her post on The Fabulous Fit System. I did end up using a bra to hold the bust in the right position, in conjunction with the Fabulous Fit System padding as well as some wadding around the waistline. I am still working on the hip/thigh area as it's not quite right yet. I didn't use all the pieces from the padding system, but the ones I did use worked out great.


Vera...front view
Vera...side view
Vera...back view
Vera...other side view
The quality of this dress form is amazing. The base is cast iron and very heavy and stable. It has wheels and can be moved around easily. The shoulders collapse inwards which allows closer fitting garments to be easily put on and taken off. The canvas cover is very sturdy and is very pinnable. The pins must be slid in at an angle of course, but this works very well. I can see this dress form will be around for a long time and I can adjust the shape as needed, by adjusting the padding.

I have been wanting to make Vogue 1179 for a while now, but have been unable to find the pattern which is now OOP. 


Line Art
Vogue 1179 line drawing.

I was particularly impressed with Sue's recent version. After studying the line drawings, and Googling every version of Vogue 1179 ever made, I decided to wing it and draft my own pattern. I didn't really know what I was doing and I probably did it all wrong ...but this is what I did.


Rough pattern cut and spread to create pleats
I based my pattern very loosely on the Named Kielo Wrap Dress, as I still had the pattern out from my recent version. The neckline was lowered, the bust darts removed and the extended side seams taken off. I then slashed and spread the front piece to create the pleats. The back was left with very straight side seams and it was cut on the fold, eliminating the centre back seam. The fish eye darts were also left off. The cowl was a simple rectangle cut to match the circumference of the neckline.


Vera at work
Vera was a huge help with pinning the pleats and adjusting the pattern to fit my shape. I added clear elastic to the shoulder seams and the neckline for stability. This beautiful knit purchased from Style Arc, a while ago is quite heavy and I was worried the neckline would stretch under the weight of the fabric. The armholes were finished off with self fabric bands.


My knock off of Vogue 1179
It has taken a while to get photos of the finished dress...life is just too busy sometimes. I have worn this dress several times already and I love the loose style.


My knock off of Vogue 1179
Closer view of the cowl and front pleats
After seeing these photos I think my version is a little looser than Vogue 1179. I would have loved to have seen the shape of the vogue pattern pieces. I think my version needs a bit more tweaking before I make another one. 


I have not regretted buying my new dress form. It has been a very useful addition to my sewing room, and I am really impressed with it's quality. I decided to name her Vera after my maternal grandmother, who was a talented sewer and made all her own clothes back in the day. I only remember her wearing dresses, always with stockings and when I hugged her she felt as hard as a rock (due to the corset she wore underneath). I'm sure she only ever had one dress pattern as all her dresses were very similar shapes with only small variations in neckline shapes, sleeve lengths and fabric types. Vera will now always remind me of happy memories of my Grandma.

Happy sewing

Saturday, 23 January 2016

Zebra Print for Jungle January

This year I have garnered my inspiration for Jungle January  from the savannah rather than the jungle. I think the only requirement is that the garment be made from an animal print, not necessarily from the jungle, and who doesn't love a zebra print.


I found this lovely zebra print in a poly/spandex knit on a recent trip to Spotlight. I actually made a top from this very fabric a couple years ago, so I was quite excited to find the fabric again. I loved the top but it was just too tight and is no longer in my wardrobe.


I used the Named Clothing Kielo Wrap Dress pattern for this dress which I have made before here. However I did make some changes. Inspiration came from Anne Whalley on Pattern Review.


The dress was shortened to just above the knee and the ties were left off completely. This allows the wings to drape loosely at the sides, creating a loose fitting, yet stylish dress.


I found the drapes did need a little bit of arranging to sit nicely. I sort of turned the corners back in on themselves, telescoping the drape rather than leaving them as flaps. Hope that made sense, it is rather hard to explain.


I also lowered the bust darts by about an inch which put them in the correct place for my body. The neckline was also lowered and the neckline and armholes were finished off with a self fabric band. This is a very comfortable dress and I think it suits my rectangular shape so much better than the wrap style of the original pattern. How is your Jungle January sewing going? I'll leave you with my inspiration picture.


Happy Sewing


Tuesday, 19 January 2016

Colette Mabel Skirt & a repeat of the Style Arc Esme Top.


Colette Mabel skirt worn with Style Arc Ann T-Top. The denim jacket is RTW.

I have made the Mabel skirt from Colette Patterns several times before... see here and here, although I have not been completely happy with the fit until now. This is a great pattern for a simple knit skirt, but I have found it does need a little tweaking, depending on the fabric used. The stretch factor of different knits can vary so much.


This fabric was originally bought with the Style Arc Esme Designer Knit Top in mind. It is a gorgeous printed scuba knit that I purchased from Spotlight a while ago. It just screamed casual summer to me...specially when combined with white. I did make the Style Arc Esme Top and I managed to eke out the Mabel skirt from the left overs as well.


I made version 1, without the design seam lines on the front, and lengthened it considerably. I had planned to add the kick pleat at the back, but the amount of fabric I had left did not stretch quite that far. Instead, I created a split in the centre back, for walking ease. This seam was pressed open and then the seam allowances were top stitched down. I find scuba knit to be very springy and hard to get to lie flat, but this worked a treat. I used some left over white cotton lycra from the T Shirt to line the waistband.


Instead of just rushing ahead with this one, I decided to take my time and work on getting the fit more to my liking. I machine basted the side seams several times before I was happy with the shape. From memory, I pegged the skirt in a little from around the hip line down to the hem, to create a little more of a curve. My body is rectangular in shape, so benefits from any added curves. I also added elastic to the waistline, as I find it slips down without it. The hem was hand sewn.

Don't mind the snoozing dog.

Now onto the Style Arc Esme Designer Knit Top that was the original reason I bought this fabric.


 This is the second time I have made this top. The first one was made in a ponte knit which sewed up beautifully. This time I used this printed scuba knit. The scuba knit was not as well behaved as the ponte and I did have to unpick and redo a few bits, so overall it was a bit more fiddly to sew.


I kept the pattern pieces exactly the same as my first Esme, including the length alteration, as I was happy with the fit the first time around.


Again, I have paired it with white. This fabric combination just looks so fresh and summery to me. These denim pants are RTW purchased from Rockmans a few years ago. As my 23 year old daughter was taking these photos for me, she made the comment that "Mother's look good in white pants". I questioned why she thought that and her reply was that "she could never keep white pants clean". I thought that was quite amusing...as if mothers have some super power to keep their white pants clean...I actually find it a struggle.


The collar was cut on the bias and sits beautifully in the scuba knit, just as it did in the ponte. Don't try and skimp on fabric to cut this on the straight grain. I don't think it would sit nearly as nicely as it does on the bias.


I had a bit of trouble getting the collar points to look as good as the ones in the ponte, but they are not too bad. I had picked this side to be the one I wanted to show as it looked the best, but I somehow got confused and sewed it on inside out. Glad I persevered and unpicked it, and resewed it on the right way. 


Both these garments were sewn during my Christmas/New Year break from work. In fact, I could have called it a Sewcation. I don't think I will ever wear this top and skirt together though...far too matchy matchy. What do you think?

Happy Sewing

Friday, 15 January 2016

A Style Arc Ginger Knit Top for Jungle January

There's nothing like an animal print and a loose fitting top to camouflage those extra few pounds that have crept on over the festive season.


I managed to whip this top up over a couple of evenings during my first week back at work, and wore it to work on Friday with my Style Arc Barb Pants. I have made this top once before here, so it seemed easier the second time around.

Style Arc Ginger Knit Top

This top is really quite a simple, yet stylish design. The front shoulder pleats and the cross over wrap create a flattering fit, and the top works well with pants and would look great with a slim fitting skirt too.


The fabric is a gorgeous jersey purchased from Style Arc a while ago. It is very good quality with a lovely drape...perfect for this pattern.


There are only three pattern pieces: front, back and back neck binding. The back is the full pattern piece so it can be cut out in a single layer. You are supposed to cut one pair of the front piece, but I found this pattern piece was too wide to cut on a double layer (fabric folded in half), so I had to cut it out on a single layer too, carefully remembering to flip the pattern piece over so that I was cutting a pair, and not two identical pieces.


The wrong side of the fabric does peek out a little at the front hemline when standing a certain way. This was a huge issue with my first version and I had to remove a large wedge of fabric from the under layer to stop this occurring. I made this version exactly as per the instructions and have not had a problem, so I don't know what I did wrong with the first one.


The print was quite a large design and I was concerned with positioning the pattern evenly over the top. I didn't have a lot of fabric to play with so I spent quite a bit of time playing around with the positioning of the pattern pieces before cutting out.


I am really pleased with how this turned out and I am glad I spent that extra time at the beginning of the project. It would have looked terrible if the same large pattern motifs had been placed side by side.


The hems were all sewn with a very narrow zig zag stitch because I was being lazy and couldn't be bothered setting up the twin needle. They all look fine and have enough stretch to prevent the thread from breaking.


This is actually my second Jungle January item sewn this month. The first is yet to be photographed...hopefully this weekend. It features a zebra print. Have you sewn something up for Jungle January yet?

Happy Sewing