Sunday 28 July 2013

All Wrapped Up

I just love McCall’s 6163 wrap dress pattern for knits (although the pattern envelope is doing it no justice). It’s a close fitting, above mid-knee length dress, with a mock wrap front, gathered at left side, collar, collar band, raglan sleeves, side zipper, sash and stitched hems. There are three sleeve variations offered…elbow length sleeves with ruching, short sleeves and long gathered sleeves with cuff.

M6163

Line Art

I made view A (size 12) with the elbow length sleeves with ruching. I omitted the zipper because it was totally unnecessary in a knit dress. This jersey was purchased online from The Remnant Warehouse


 Lessons Learned


  • Don’t need to hem inside edges that will never be seen
  • The interfaced side of the collar will be the one that shows.
  • Good fit in shoulders and neck, but too snug around the middle.
  • The collar makes this dress look dated (according to my loved ones)


Close up of bodice and sash.

Collar and collar band

Left side gathers

Sleeve ruching
The pattern tells you to make a casing for the elastic in the seam allowance. I just sewed some clear elastic directly onto the seam allowance to make the ruching.

Inside details. After sewing the seams on my machine, I then finished them off on the overlocker.
The collar band was finished off with some hand stitching.
I really liked this dress, so I thought I would give it another try, with a few modifications.


First, I altered the pattern by removing  the collar and redrawing the neckline. Then I cut a size 12 in the shoulders and sleeves and increased to a size 14 below the armscyes, to the hem. I finished off the neckline with a knit binding, instead of the collar. For the binding, I followed this tutorial from Art Attack This certainly removed a lot of sewing time. I purchased this jersey from The Remnant Warehouse as well.

New neckline with binding (no collar)

Back view.

Side View with sleeve ruching
I am quite pleased with my second attempt at this wrap dress. I have worn it several times already. The modified neckline has made this pattern more fashionable and the tribal print fabric is right on trend at the moment. I love the raglan sleeves, so much easier than setting in sleeves. I would like to try the short sleeve version for the summer.
Well, that a wrap for now (sorry, I couldn’t resist)

Happy Sewing

Monday 22 July 2013

The Claustrophobic Top

I really wanted to like this top. I was excited to make it after reading several favourable reviews on Pattern Review, but I have been bitterly disappointed.


New Look 6150 View A

To be fair, I can’t really blame the pattern. I think it was a combination of factors that led to this disaster.


 I chose the wrong size (I seem to be doing this a lot lately). It was too clingy, revealing every spare tyre around my middle (although the gathered crossover bit at the front does disguise this to a certain extent). And I am coming to the realization that I must have a longer body length than the average person. This top is way too short on me, even after turning up a smaller hem than instructed.


Side gathering.
 My fabric choice was awful. Some sort of polyester knit purchased from my local Bargain Box Fabrics, that attracted static electricity and just did not breathe. It feels like you are wearing a raincoat. And what is going on with that crossover front??? I don’t know whether it should be placed over my breast or under my breast. Neither seemed comfortable, and if I placed it under, it kept slipping up again and choking me.


And I really didn’t like the look or the feel of that high neckline. Not flattering at all.
This is a more flattering neckline
Back View
Even less flattering is the back length as my 18 yr old son delicately informed me as I sat hunched over the sewing machine (while wearing the top), that I was revealing plumber’s crack.


NO PHOTO HERE


Here are some close up shots of the details:


Shoulder gathers
Twin needle hems (I used white thread because I didn't have a matching blue)
Back neck
I found the pattern instructions were quite clear except for the pleat at the shoulder/neck. This took me a while to figure out. One thing I didn't like was how the pattern instructed you to stitch a hem on the front and back neck edges. This makes the under layer of the crossover edge really obvious which spoils the look. As the fabric is a knit and does not unravel, there is no need to hem this edge. It is designed to form a self facing, so this edge is never seen from the outside of the garment. If left raw, it would be much less bulky and so less noticeable.


Well, despite all this negativity, I haven’t given up on this pattern yet. I have plans for another version…larger size, nicer fabric and I have plans to lower that neckline and lengthen the top.
Stay tuned for the sequel.


Happy sewing.

Sunday 21 July 2013

Cute Cowl Tops

Back in the summer I made this cute cowl top.


 It’s New Look 6470 View B.


Unfortunately, I cut my usual size 12 (as I do in knit patterns, going down 1 size from my usual size 14) but this pattern must run a little on the small side. And to make matters worse, (in my attempt at efficiency) I had cut out two tops at once, before I realised the sizing problem. They are just wearable, but I feel very self-conscious wearing them, because they are very clingy and show every spare tyre round my middle. Probably not a great look. Also, I feel they would look better on me if I lengthened them about 5 cm (2 inches).

I was careful when cutting out to avoid placing the green circles directly over my boobs.

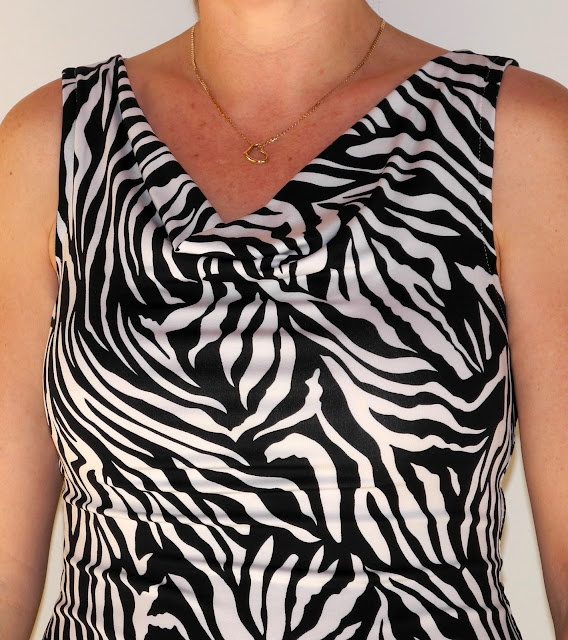
I love the zebra stripe fabric
Closer view of cowl
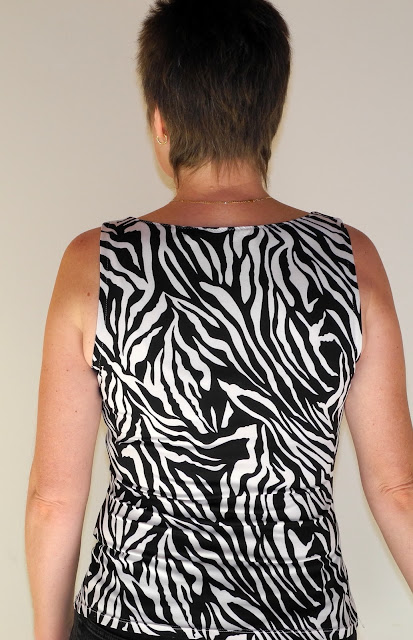
Back view ( far too tight for my liking)


I did use a tip from Mazzygirl on Pattern Review for widening the cowl facing. http://sewing.patternreview.com/cgi-bin/readreview.pl?reviewnum=70311&readreview=1

Widening the depth of the cowl facing and catching it in the armhole hems worked well to keep everything in place.
I then had a third attempt at this pattern, with some alterations this time. I added to the side seams to get a looser fit and increased the length. Here is the result:


Adding to the length was a definite improvement.

Can you see the new problem I created?


I have learned an important lesson here. If you add to the side seams, this will make the armhole bigger too. Not always ideal. Next time I will add the additional width at the centre front and centre back to keep the armholes the same, or maybe I should just make the bigger size?


This view on my dress form shows how much the armhole gapes and shows my bra.
Another mistake that I learned from:

Always leave needle down whilst sewing to avoid steps like this.


I guess this top looks OK with a cardigan and it feels much more comfortable with the extra room.


Love it here worn with my Style Arc Nina Cardigan
As soon as the weather warms up (it’s now the middle of winter down under) I can see myself having another go at this pattern, and I anticipate achieving far greater success, now I have worked out what not to do.


Happy sewing.