Showing posts with label Archer. Show all posts

Monday, 12 June 2017

Grainline Studio Archer #3...The Floral Version

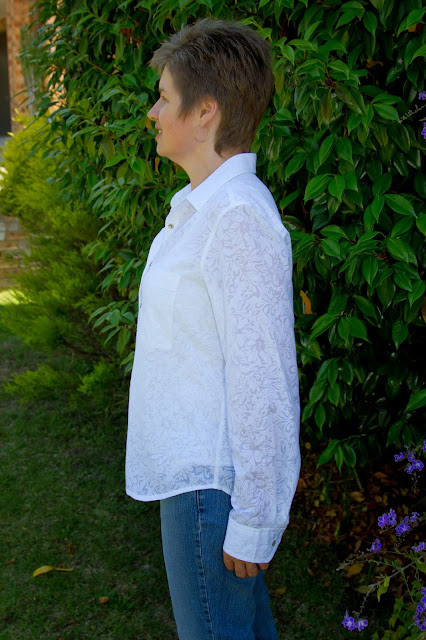
I finally completed my 3rd Grainline Studio Archer Button Up Shirt towards the end of May. You may have seen it in action during Me Made May.


I started this shirt back in April, but my husband had an accident while out on a mountain bike ride, fracturing his pelvis. He spent four days in hospital and then required a lot of help at home to do just about everything. Needless to say, my sewing had to be put on the back burner for a few weeks. Glad to say he has recovered well and is now back at work.


I made this version with the same adjustments as I made for my 2nd version. This time I avoided using a poly cotton blend, and chose this pretty Japanese Lawn (Cluster Floral Pink) 100% cotton, from Spotlight.


I'm wearing it here with my Style Arc Elle Pants in Denim look stretch bengaline, also from Style Arc. The cotton lawn was a dream to sew and pressed beautifully. I didn't have any of the issues I had with my second version.


It was really hard to photograph this pretty fabric as the light is so harsh at this time of the year. I'm really happy with the shape and fit of the shirt.


Instead of buttons, I used these pretty pink snaps that I had in my stash. They were such a good match and I love how they turned out. I only had nine of them, and I needed 8, 6 for the front and 1 for each cuff. I managed to wreck the first one by trying to install it upside down, so the pressure was on to not make anymore mistakes.


All the top stitching was done in white thread. I did add a little extra width to the side seams and arm seams, when cutting out, so that I could do proper flat felled seams.


I love how flat felling makes the inside look as neat as the outside. It's well worth the effort even if it is a bit fiddly sewing down the length of the sleeve.


I found it works out fine if you take it slowly and let the fabric bunch up behind the foot as you go along. I'm really happy with how this Archer turned out and I have worn it a few times already. All the photos were taken by my husband down at our local beach.


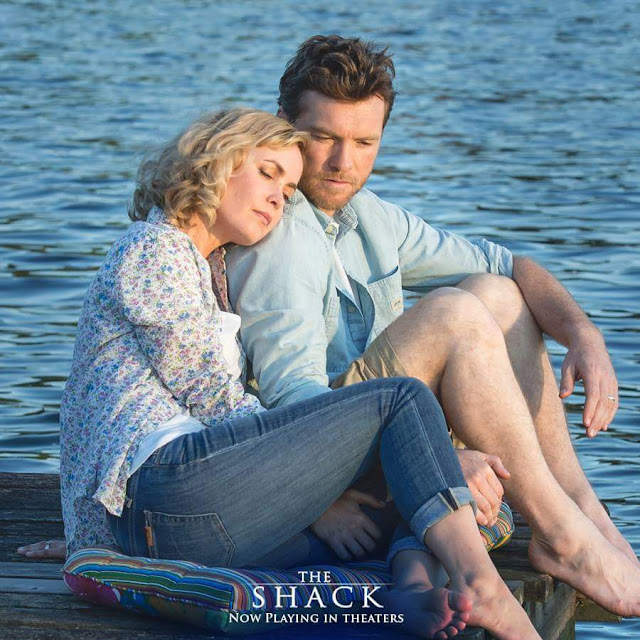
 While I was scrolling through Facebook the other day, I stumbled upon a funny coincidence. This add popped up for a new movie "The Shack" and I couldn't believe my eyes when I saw the actress was wearing my shirt. I'm sure it is the same fabric. 


Happy Sewing

Jean

Sunday, 4 October 2015

Pink Fleece Tops

Mum gave me a large piece of pink fleece from her fabric stash last year. It took me a while to get to it but I have now used it to make two different tops, based on the same pattern. I know you are probably sick of hearing me rave about the Tilly and the Buttons Coco, but I find this pattern is a great base to work from.

The first top I made way back during Me Made May 15, and those who follow my blog got a sneak peak back then.


This was a straight size 5 with the boat neck and two front pockets. I have worn this a lot over winter as it's lovely and cosy in the fleece. The only draw back is that it seems to keep shrinking with every wash, despite pre-washing the fabric. The sleeves are now quite a bit too short.


The second top was based on the same pattern with quite a few changes. I straightened the side seams from the underarm down to the hem, removing all shaping to create a boxy effect. I borrowed the scoop neckline from the Sewaholic Renfrew as I have done before, and I cut a high - low hemline.


This top was really just a bit of an experiment and has resulted in a wearable muslin. I have learnt a bit during the process and there are things I will change for the next one.


A close up of the side slits and the overly exaggerated high - low hem. I will lengthen the front next time so the difference is less exaggerated.


I had intended to use a knit ribbing band to finish off the neckline, but when I pulled out the ribbing, the colour was not a good match. So I stabilised the edge with clear elastic, turned and top stitched with a twin needle. This worked out quite well. I am wearing it with my Grainline Archer blogged here. 

(These photos were taken during our overnight stay on a yacht in Pittwater, just north of Sydney, for our first wedding anniversary.)


Happy Sewing

Sunday, 26 October 2014

My Archer of Tribulation

I have finally finished my second Archer Button Up Shirt by Grainline Studio. This was my Archer of tribulation. I had difficulties at every stage, and it is nothing short of a miracle that it has reached completion and is not laying discarded in the corner of my sewing room.


I blame most of my issues with this shirt on my fabric choice. I wanted a fine gingham so that I wouldn't have to be too careful with pattern matching. Unfortunately, the only fabric available in the fine gingham at Spotlight at the time, was a poly/cotton blend. I think it was 80% polyester and 20% cotton.

My first issue was with the fusible interfacing. I just used the same interfacing that I always use, purchased from my local Bargain Box Fabrics. They sell two types of fusible interfacing...a cheap and nasty lightweight interfacing, and a cheap and nasty medium weight interfacing. The minute I fused the interfacing to the fabric the fabric wrinkled and bubbled and shrank. I had to re-cut the collar. I did some testing on scraps but I couldn't stop the bubbling effect. In the end I decided to underline the collar and cuff pieces with another white poly/cotton fabric I had left over from another project which didn't wrinkle and bubble when I fused on the interfacing.


This fabric did not like to be sewn. The seams puckered and I had terrible trouble getting them to lie nice and flat. For this reason I decided not to faux flat fell the seams. I just finished them off with the overlocker and left good enough alone. You can see in the photo above there is something weird going on with the yoke. It wants to pull up in the centre and is creating a fold of fabric at the base of the neck. I didn't have this issue with my first Archer which I made out of a cotton voile, so can only attribute this to the fabric.


I did make a couple of minor changes for my second Archer, based on what I learned during the construction of my first one. I cut a size twelve, as before, but I cut the sleeves in a size 8. These fitted perfectly into the armsceye and are a much more pleasing width and length. I also added 5cm (approx 2 inches) to the length of the front and back, at the waistline. To try and take away the boxy shape of the shirt I tapered the side seams slightly by 1cm (approx 3/8ths of an inch) at the waistline curving back to nothing at the armsceye and hemline. I am pleased with the shape of the shirt now, still loose but a little more figure flattering.


Two piece undercollar and collar stand
As you can see I didn't give any thought to pattern matching the two piece under collar which is a bit of a shame because it would have looked really good. Must keep that in mind for the next one. Due to underlining the collar and cuff pieces there was quite a lot of bulk in these areas. Luckily my trusty Bernina powered through all the layers without a problem.


Angled cuffs
I think the angled cuffs are a nice feature. I sewed continuous plackets as instructed in the pattern but they puckered terribly. I did the best I could and tried to press the puckering out but I didn't have great success.


Pockets
The pockets also gave me grief. When I pressed the pockets before attaching them, the fabric skewed strangely. At least they did this symmetrically. I was really worried that this would be very obvious and ruin the look of the shirt, but I don't think it is too noticeable if you don't look too hard. The last job was the button holes and buttons. I had every confidence that this would go well as my Bernina has an automatic buttonhole foot and setting so that once you set the button hole length it will reproduce identical button holes over and over. Well, how wrong I was. I think I spent about three hours on these button holes and I unpicked nearly as many as I sewed. The fabric puckered so I started using a tearaway stabilizer on the back which eliminated the puckering. Then my button holes were sewing with each side offset from the other by a few mm each side. I got very good at unpicking buttonholes. In the end, I started again and reset the buttonhole length. This, combined with the tearaway stabilizer worked a treat and I was able to go ahead and complete the remaining button holes without a hitch.


Despite all my problems during the construction of this shirt, I am glad I persevered and finished it. Probably not my best sewing but at least it is a wearable garment and I have learned never to bother making this in a poly/cotton again. Next one will be a nice soft cotton shirting or maybe a linen.


Happy Sewing

Sunday, 24 November 2013

Button Up Shirt for Me

After my foray into sewing for others "The Birthday Shirt" and "The Madeline Dress", I have gone back to selfish sewing and made myself a button up shirt. This is a make I have had on my list for quite a while now, but haven't quite had the confidence to start.


I used the Archer Shirt Pattern from Grainline Studio. I was inspired by so many other Archers out there in blog land. Check these out PinterestGoogleFlickr. So many shirts for inspiration. I chose to make View A. The pattern has a collar and separate collar band, a back yoke, a pleat in the centre back, a separate button band, pockets, long sleeves, angled cuffs and a continuous cuff placket.


I chose a lovely sheer cotton/poly voile in white which I purchased online from The Remnant Warehouse and it is still available. I love this fabric. Although it is very lightweight, it was easy to sew and pressed beautifully and it feels very soft and floaty to wear.

Although I did follow the Archer Sew Along which was great, I still found myself referring back to the Craftsy Class "The Classic Tailored Shirt". This class had so much more detailed instruction and I would thoroughly recommend it to anyone new to sewing button up shirts.


Front view (worn with a white tank top underneath for modesty)


Side View (Notice the huge sleeves)


Back view

I sewed a straight size 12 which was the correct size for my bust measurement. This shirt is loose fitting, but the sleeve proportions are ridiculous. I have long arms yet these sleeves are way too long and full and the cuff circumference was huge. No wonder so many reviewers had said they used a smaller sleeve size.


Oh dear, sleeves are too long.
Angled cuff detail
Back yoke and pleat
I sewed the seams on my sewing machine (note this pattern has 1/2 inch seam allowances) and then overlocked the seam allowances together with my overlocker, pressed to one side and then top stitched. This gives the look of flat felled seams without all the work. I did consider doing french seams, but with the 1/2 inch seam allowances, and french seams being a new technique for me, I chickened out.

Front detail and close up of fabric.
After reading Art Attack's blog about one of her Archer's, she inspired me to try "snaps" instead of buttons. I ordered the Snapsetter tool and snaps from SnapSource.com. I was very impressed with this company. The website is very easy to navigate and place an order. It took two weeks exactly from placing the order to receiving the order on my doorstep (that's USA to regional Australia). So this is the first garment I have tried them on and I am very happy with the result.


I'm sure I will be sewing more Archer's down the track.


Happy Sewing