Showing posts with label Jacket. Show all posts

Wednesday, 14 September 2016

Paprika Patterns Jade Skirt and another Style Arc Estelle Jacket


Continuing on with my love affair with Style Arc ponte, I have created this ensemble using the Paprika Patterns Jade Skirt and the Style Arc Estelle Ponte Jacket. Fabric is a taupe ponte purchased from Style Arc, which is currently unavailable.


This is the second time I have made the Estelle jacket and I don't really have anything more to add about this pattern, except that I love it and it has been getting a lot of wear. You can read about my first one here.


I still couldn't leave the edges raw. This time I turned a 1cm hem twice and machine stitched close to the edge.


The Jade Skirt is a "curve-hugging skirt that you'll feel comfortable in" according to the website description. The unusual folds on the front are what make this skirt stand out from the usual fitted knit skirt patterns available.


These required precise accuracy at the construction stage, which was not that difficult...just a bit fiddly. The instructions were excellent and there is also a short video on the website, which I found very helpful. I lined the skirt with Vanity Fair Lingerie Tricot purchased from Knitwit. Each fold is sewn to the lining to keep it in place.


The skirt is very figure hugging, and I would only feel comfortable wearing it with a long jacket . I like the shape of the skirt paired with the shape of the jacket. The jacket also works well with pants and in the photo below I am wearing it with Style Arc Elle Pants on our recent holiday to Western Australia. The photo is taken in front of the Busselton Jetty.


Both these garments have been great additions to my wardrobe and have been worn a lot, both together and individually.

Happy Sewing

Monday, 20 June 2016

Style Arc Estelle Ponte Jacket


This is a fabulous jacket that I have been itching to make for a while now. Megan and Sue have both recently made this jacket and after a long wait the pattern finally arrived from Style Arc and I couldn't wait to get started. (This delay seems to be an Australia Post issue.)


As described on the Style Arc website "This fabulous jacket is not just easy to wear but it is very easy to make. The knee length and the gorgeous waterfall collar makes this jacket a great trans seasonal addition to your wardrobe. A project you can complete in an afternoon."

Style Arc Estelle Ponte Jacket

I had this gorgeous indigo renewal wool ponte purchased from Knitwit with intentions of making some sort of warm jacket. I work in a chilly office and I am determined to make some warmer things to keep me from freezing this winter. At $49.95 a metre I was nervous of making a wadder, but after doing lots of research and knowing that Style Arc patterns generally fit my body shape quite well, and that this was a loose fit style, I went ahead and cut a size 12.


And I am very happy with the result. These photos were taken in a rush this morning just before I left for work. I am wearing it with a Colette Mabel Skirt and a Deer and Doe Plantain Tee. I can see it working with lots of other things in my wardrobe too, and after wearing it today I am happy to say it was warm and comfortable...just what I needed.


This is a photo I posted on IG on Saturday night, with all the edges left raw. The general consensus was to leave the edges raw, which both Megan and Sue have done. I left it overnight but Sunday morning I decided to finish off those raw edges. It just didn't look right or feel right to me, left like this. Even though I had used a rotary cutter and the edges were quite neat, they were not perfect.


The instructions say to sew the seams as "flat seams". This means sew the seam, then trim away the left seam allowance, then turn the right seam allowance over the cut away left seam and stitch the seam allowance down. This creates a nice flat seam, similar to a flat felled seam, without tucking the raw edge under. Can you spot the huge mistake I made in the photo above? Yes, I sewed the back collar seam inside out so that the raw edge is visible when the collar is folded down. I was too far into the construction before I realised my error...but I think I can live with it.


I deliberated long and hard about how to finish off the raw edges. The ponte is quite bulky and I could see it would be difficult to do a neat job of turning a 1cm hem twice and stitching. I quite like the look of the flat seams on the inside so I embraced this look and simply turned a 12mm hem in a single fold and stitched very close to the raw edge. Although this is quite a simple technique, it took me ages to accurately measure, press and pin the entire edge of this jacket. I knew this finish would only work if it was done very neatly and I am very happy with the result.


With the waterfall front on this jacket the wrong side shows below the turn of the lapels. If I continued to turn the hem the same way around the bottom edge of the jacket, the wrong side would be showing, so I decided to switch directions at the bottom front corners. You can see this corner in the photo above. I trimmed a square from the corner to remove some bulk and I used some Vliesofix-bondaweb-tape to help hold them securely. This resulted in a nice neat corner.


I finished the sleeve hems exactly the same way, which meant I didn't lose too much length, and they visually match the rest of the jacket.


Above is a shot of the inside showing the flat seams at the shoulder and armhole and also the wrong side of the lapel edge finish.


And another inside shot showing the in seam pocket. I finished off the side seams with the overlocker because it was late and I was getting tired and I couldn't think how to do flat seams with the pockets.

This jacket took me much longer than an afternoon to construct, but if you leave the edges raw it is an easy and quick sew. I am so glad I spent the extra time finishing the edges...to me it was well worth it.

Happy Sewing


Tuesday, 8 September 2015

Blue Grainline Morris Blazer

The new Morris Blazer from Grainline Studio has certainly been doing the rounds out there in blogland. I finally succumbed and bought the PDF version.

Grainline Studio Morris Blazer
After doing lots of internet research, reading many reviews and looking at many Morris Blazers made up on many different body shapes, I decided to make a couple of small changes to the pattern. I cut a size 10 based on my bust measurement and I lengthened both the sleeves and the body by 8cm (about 3 inches).


I am quite long in the body and relatively tall about 173cm (5' 8") and cropped jackets don't suit me very well. I am happy with the new proportions these alterations achieved.


This jacket is quite boxy so if you are after some shaping, this is not the pattern for you. I like the way the jacket fits and it turned out just as I had expected.


The sleeves are only just long enough with the extra length I added and I may add a bit more length for the next one. The original pattern is not intended to have full length sleeves, this was just my preference.


The hems and front openings are finished off with a separate interfaced facing. This provides some structure to these key areas. I did find that the front facings tend to want to flip out a bit during wear, so I may catch them down with some hand stitching to keep them in place. The front edges are finished off with top stitching.


The hem facing is also top stitched which creates an interesting line at the front points. The fabric I used for this blazer was a Monaco Double Knit in Sapphire Blue purchased from Knitwit last year. This was one of my disappointing online purchases that was nothing like I expected and totally unsuitable for what I had intended to make, and therefore has been sitting in my stash for quite a while. Well, if you wait long enough, the perfect pattern turns up. This fabric was ideal for the Morris Blazer and Knitwit currently has this fabric on sale and it comes in lots of lovely colours too.


As you can see in the photo above, I simply overlocked the raw edges of the facings rather than turning them under. I had matching thread in the overlocker, so I thought this would look ok and reduce any unnecessary bulk. 


I can see a few more Morris Blazers in my future, and I can see why this has been a very popular pattern. It is quick and easy to make as well as being easy to wear.


Happy Sewing

Monday, 20 July 2015

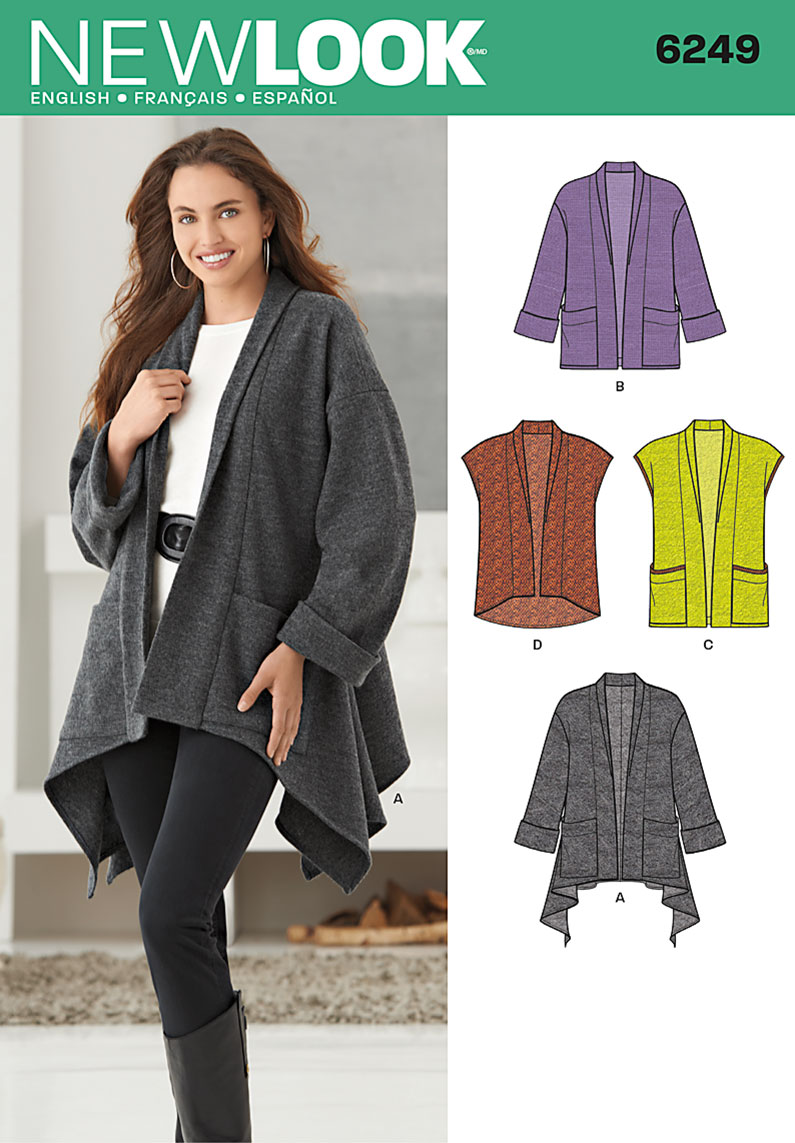
New Look 6249 in Bellagio Italian Knit.

New Look 6249
It has been an extra cold winter this year and I have really been feeling it. We had snow falls on the Tablelands just last week...a very rare occurrence. I live a few hundred metres from the ocean and we don't even experience frosts here, but it has been freezing. I was in desperate need of something warm to throw over my work outfits.

I wanted something simple, loose fitting and most importantly, WARM. I found a suitable fabric online from Knitwit in Perth, Western Australia. A Bellagio Italian Knit which is described as a beautiful warm fabric to make stylish coats, jackets or capes. I then went on the hunt for a suitable pattern.

I ended up choosing New Look 6249 which was available at my local Bargain Box Fabric.


Originally, I chose view A (the one on the model with the shark bite high low hem) but when the fabric arrived and I realised how thick and bulky it was, I revised my plans. I ended up going with view B and lengthening it by 18cm.


I made a size medium which turned out just right. There is plenty of room to fit a cardigan or jumper underneath without feeling constricted at all. The addition to the length turned out very well too (which was the maximum I could add due to fabric restrictions). 


I love the subtle cocoon shape from the back. This works well with long pants or pencil skirts.


The shoulders are quite dropped and the fit is very loose. There are no closures.


The pockets are very roomy and are great for keeping your hands warm. They were very easy to construct. After finishing off the raw top edge and turning inside, the lower edge of the pocket is sewn to the front. The two sides are then secured in the side seam and the front band seam. If I make this up again I would lower the pockets slightly, as I find them to be a little high.


Another change I made to the pattern was to finish off the sleeves with bands. The pattern says to sew a deep hem and then turn back to form a cuff. This fabric was very bulky and that would have been four layers in the cuff. I cut about 18cm off the length of the sleeves. I folded the off cut in half forming a band and then reattached it to the sleeve. This had a similar look to a cuff without the extra bulk.


I used my sewing machine with the walking foot to sew all the seams on this jacket. It handled the bulk with ease. I used the overlocker to finish off the raw edges. It did struggle with anything more than two layers but I got there in the end. I pressed the seams open to make them less bulky. The hem was sewn by hand and the hand stitching just disappeared into the fabric. I also hand stitched the overlocked edge of the front band down for a neater finish.


The shawl collar can be worn standing up on those very cold mornings to keep you extra warm.


Or folded over, as the pattern intended. Either way looks fine.

This jacket has been worn almost daily since I finished it and has been a most welcome addition to my wardrobe, and it is very warm too.


Happy Sewing

Tuesday, 6 May 2014

Floral Denim Jean Jacket

I fell in love with this gorgeous floral stretch denim the minute I set eyes on it on the Lincraft Website. I already had the perfect pattern...Style Arc's Stacie Jean Jacket in the pattern stash.

Gorgeous Floral Stretch Denim from Lincraft.
I have already made this jacket in a plain denim blogged about here. The only changes I made to this jacket were to lengthen the sleeves.

I agonised over laying out the pattern on the fabric. I ended up tracing extra copies of all the pattern pieces so that I could cut the jacket out on a single layer and better visualise how the pattern was going to look once all the panels were joined.

Laying out the pattern on a single layer of fabric.
I think I spent more time laying out the pattern than it took to sew up the jacket.

Front open
Back open

The size 12 was a perfect fit and after lengthening the sleeves by 5cm they are the perfect length too.

Front buttoned up

Back buttoned up
I did the top stitching with a green thread that matched the greens in the floral pattern. This time I just used a single needle to top stitch (on the last jacket I used a twin needle) and slightly lengthened the stitch.

Top stitching detail on pocket flap
I was a little disappointed with how the top stitching turned out along the seams. I was using the width of my presser foot as a guide. This was just a couple of millimetres too wide and the stitches didn't always catch the seam allowance underneath. This made the top stitching look a little wonky in places. The weave of this fabric is quite loose and it made unpicking very difficult. The stitches just sank right into the fabric and I was worried that I would cut a hole in it. After unpicking two whole rows of top stitching down the centre fronts (that took forever), I thought I had better leave "well enough" alone.

Collar and front facing.
The first time I made this jacket, I had trouble with attaching the collar. It only seemed long enough to reach from the inside edge of the facing on each side. This time I staystitched the neck edge to avoid any stretching out of the fabric and I was able to attach the collar at the centre point of each front facing, which is how it should be, I think.

Button, buttonholes and front panel pattern matching (woops, see the mistake)
After all my exhaustive efforts with the cutting out of the jacket, I have made a very silly mistake. The pattern matches beautifully across the front centre panels now, but what happens when the jacket is buttoned up?   #%*$

Love the fold back cuff.
Overall, I really pleased with my new jacket. It's fairly light weight so I may have to wait for next spring to wear it.


Happy Sewing

Sunday, 4 August 2013

Jean's Jacket

Yes, I made myself a Jean Jacket (how appropriate seeing that my name is Jean).


 Not just any old Jean Jacket...this is the Stacie Jean Jacket from Style Arc.

Trendy jean, denim or woven jacket
STACIE JEAN JACKET: Great Jean Jacket sitting on the high hip with flattering shaping through the body. The sleeve features a deep hem so can be worn turned up for a casual look.

I cut a straight size 12 with no alterations (based on my measurements and Style Arc's sizing chart). Fabric used was a medium weight denim 97% cotton and 3% spandex, so it had a little bit of stretch. It was an unusual purple colour on one side and a navy blue on the reverse side. I purchased this fabric from my local Bargain Box Fabrics.

Front buttoned up


Back view

I love the flattering shape of this Jean Jacket. It is not square and boxy at all, like a lot of Jean Jackets are.

The pattern instructions are fairly minimal and a beginner sewist may struggle with them. They are more like a list of construction steps. They do include a detailed diagram for all the top stitching...and there is a lot of top stitching on this jacket. The pattern is very well drafted and all the pieces go together perfectly.

Front pocket flap

I just used normal Gutermann 100% polyester thread in a hot pink, for the top stitching which I sewed with a twin needle. This contrasted nicely with the purple fabric. I spent an awful lot of time changing thread and needles on my machine during construction...alternating between top stitching and normal stitching. This was quite a labourious process and certainly added a lot of time to the sewing of this jacket. In hind sight, I could have saved a lot of time if I had set up my other machine as well, and used one for top stitching and one for regular stitching (however, I had recently purchased my new Bernina B 350 and the novelty had not worn off yet, so I wanted to use it for everything). 

More top stitching - waistband and centre back seam detail.

Collar Detail

I'm not sure if I joined the collar correctly to the neckline. I thought the front edge of the collar should have started about half way across the front band. I wondered if maybe I had stretched the neckline during construction, because the collar did not seam long enough. Then I studied the line drawing of the jacket and it appears that I have joined the collar as intended. However the point between the front band and where the collar joins, seams to be a weak spot so I did add a few tiny hand stitches to join the collar to the front band for a bit of added strength. 

The pattern does not call for the use of interfacing, at all which I thought was a bit strange. I followed the pattern directions, and did not interface the collar or the front bands and waist bands. The jacket feels fine without being interfaced, probably because the fabric I used was quite sturdy.

Sleeve and cuff.


The sleeve cuff is created easily. The hem of the sleeve is quite deep so this can be turned up to form a cuff.

Although the size 12 fitted me quite well without any pattern alterations, I will make a couple of changes for the next one. The sleeves were barely long enough for me (I must have monkey arms). This is actually a problem I have with buying RTW shirts...the sleeves are always too short on me. So I will be adding probably another 5 cm to the sleeve length. Also, the length of the jacket was much shorter on me compared to the line drawing, so I may add some length here next time too...and yes there will definitely be a next time. I would love one of these jackets in every colour of the rainbow.


I have already worn my Style Arc Stacie Jean Jacket several times and I can see it is going to be a favourite item in my wardrobe.

Just before I finish I thought I would share a photo of my loyal little sewing buddy who is never far from my side when I am sewing and who was a keen observer during my photo shoot this morning.

Ollie


Happy Sewing