Showing posts with label Cardigan. Show all posts

Monday, 20 July 2015

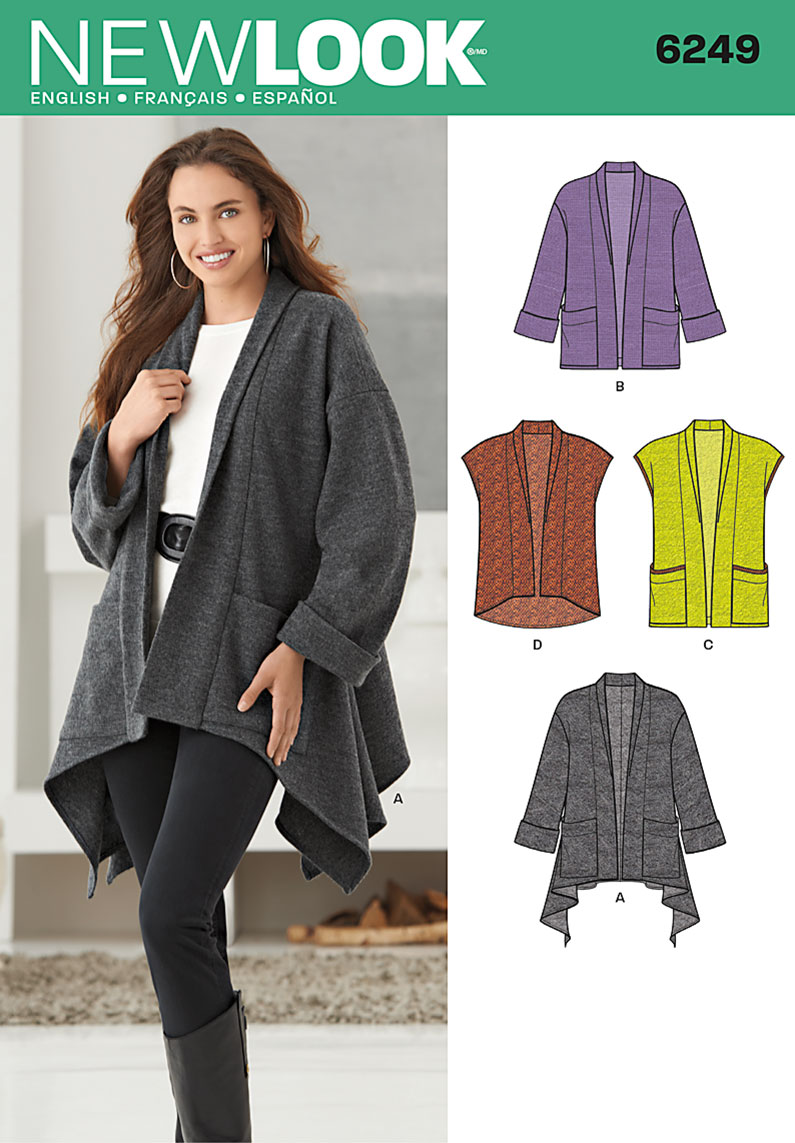
New Look 6249 in Bellagio Italian Knit.

New Look 6249
It has been an extra cold winter this year and I have really been feeling it. We had snow falls on the Tablelands just last week...a very rare occurrence. I live a few hundred metres from the ocean and we don't even experience frosts here, but it has been freezing. I was in desperate need of something warm to throw over my work outfits.

I wanted something simple, loose fitting and most importantly, WARM. I found a suitable fabric online from Knitwit in Perth, Western Australia. A Bellagio Italian Knit which is described as a beautiful warm fabric to make stylish coats, jackets or capes. I then went on the hunt for a suitable pattern.

I ended up choosing New Look 6249 which was available at my local Bargain Box Fabric.


Originally, I chose view A (the one on the model with the shark bite high low hem) but when the fabric arrived and I realised how thick and bulky it was, I revised my plans. I ended up going with view B and lengthening it by 18cm.


I made a size medium which turned out just right. There is plenty of room to fit a cardigan or jumper underneath without feeling constricted at all. The addition to the length turned out very well too (which was the maximum I could add due to fabric restrictions). 


I love the subtle cocoon shape from the back. This works well with long pants or pencil skirts.


The shoulders are quite dropped and the fit is very loose. There are no closures.


The pockets are very roomy and are great for keeping your hands warm. They were very easy to construct. After finishing off the raw top edge and turning inside, the lower edge of the pocket is sewn to the front. The two sides are then secured in the side seam and the front band seam. If I make this up again I would lower the pockets slightly, as I find them to be a little high.


Another change I made to the pattern was to finish off the sleeves with bands. The pattern says to sew a deep hem and then turn back to form a cuff. This fabric was very bulky and that would have been four layers in the cuff. I cut about 18cm off the length of the sleeves. I folded the off cut in half forming a band and then reattached it to the sleeve. This had a similar look to a cuff without the extra bulk.


I used my sewing machine with the walking foot to sew all the seams on this jacket. It handled the bulk with ease. I used the overlocker to finish off the raw edges. It did struggle with anything more than two layers but I got there in the end. I pressed the seams open to make them less bulky. The hem was sewn by hand and the hand stitching just disappeared into the fabric. I also hand stitched the overlocked edge of the front band down for a neater finish.


The shawl collar can be worn standing up on those very cold mornings to keep you extra warm.


Or folded over, as the pattern intended. Either way looks fine.

This jacket has been worn almost daily since I finished it and has been a most welcome addition to my wardrobe, and it is very warm too.


Happy Sewing

Friday, 6 June 2014

Deep Red Peplum Cardi

You may have seen a peak of my McCall's 6844 Deep Red Peplum Cardigan during Me Made May. I have previously made View B in royal blue, but was a little underwhelmed by this pattern, despite it being pattern of the year for 2013 on Pattern Review.


This time I made view C which has a peplum with a shaped hemline. I used this Deep Red Ponte De Roma purchased from Lincraft.

Front view
I lengthened the hemline by 8cm because I thought the original length would not be flattering on my figure, and I am so glad that I did. I am really pleased with this length.

Side View
You can see in the side view how the hemline dips lower at the back. The peplum gives my rectangular figure some much needed curves.

Back view
As before, I made a straight size Medium with no alterations other than increasing the length of the peplum. I also interfaced the front band which has made it sit much better and I regret skipping this step in my blue version.

I interfaced the front band.
The peplum is really just a circle skirt joined to the bodice. The pattern instructions did include a great tip for hemming the peplum. First stitch 6mm from the lower edge of the garment, using long machine stitches (as you would for gathering). Then turn up 1.5cm hem at lower edge of garment, turning in 6mm on raw edge and tucking under. You can then use a pin to pull the gathering thread to ease in the fullness, and press (pinning as you go).

Here you can see the loop of the gathering thread that has been pulled to ease in the fullness.

This was a very long hemline.
The hem was top stitched using the width of my presser foot as a guide. You will notice that I have moved the needle over to one side to get the desired distance from the edge of the garment for the stitching line, while still being able to use the edge of the presser foot as a guide.

Close up of side

Close up of peplum skirt.

Inside view. Seams were all finished on the overlocker.

Overall I am very happy with this cardigan so McCall's 6844 has redeemed itself. I can now see why so many have raved about this pattern. Just keep in mind that the sleeves are very fitted and will need to be widened if you intend to wear anything with sleeves under it. I would recommend interfacing the front band and securing it in a few places with a few hand stitches so that it sits properly. And I would also recommend lengthening the peplum on version C so that it sits at a more flattering position.


Happy Sewing

Tuesday, 27 May 2014

The Terry Tie Cardi from Style Arc

I have been sewing quite a few practical garments lately, which have been filling a gap in my wardrobe. My latest effort is the Terry Tie Cardi from Style Arc.

Style Arc Terry Tie Cardi
A stylish and comfortable cardi with shoulder tucks and front tie detail.This is one of their older patterns and it gives a nice flattering silhouette.

Style Arc Terry Tie Cardi Line Drawing.
I used a marle grey ponte de roma purchased from Lincraft. This was probably a bit heavier than the fabric they recommend, but it gave the result I was after. This is a nice warm cardi but it still has enough drape to work as designed. I cut a straight size 12 with no alterations.

Front
The ties are sewn into the front darts. When tied together they pull the fronts together creating draping folds of fabric at the front, and nipping in the waist line. The centre fronts also hang lower and this also adds to the flattering effect.

I had terrible trouble trying to work out the pleats at the shoulders. The instructions for this are very sparse, and you are really only given a series of notches across the front shoulder. I ended up making 5 small pleats about 6mm wide which worked out ok and the front shoulder length matched the back shoulder length. I did quite a bit of unpicking before I figured this out. The rest of the construction was easy and came together without any problems.

Back view
Even though the back has no darts it still has some shape. The length was fine on me. I did end up with a bit of a bubble effect at the back neck. The back neckline is finished off with some binding. There is a pattern piece for a vilene stay which I didn't use. I was concerned that the neckline might stretch out without this, but it seems to be a little tight rather than stretched.

Hem line
The hems were all finished off with a twin needle which sewed beautifully on the ponte. My only real disappointment with this pattern is the front opening edges. The raw edge is folded back 1.5cm and secured at the top in the shoulder seam, and at the bottom in the hemline. This means it is unsecured all the way down the front. In the photo above you can see where it has flopped forward, revealing the raw edge. I do plan to fix this by securing it with some Steam-a-seam lite when I can buy some. All my local stockists are having trouble getting any in at the moment.


This has been a great practical addition to my wardrobe and I am sure I will get a lot of wear out of it.


Happy Sewing

Tuesday, 13 May 2014

A Stylish Blue Cardi

I have jumped on the bandwagon and purchased McCall's 6844 which was voted Pattern of the Year for 2013 on Pattern Review. There have been so many favourable reviews of this pattern that I thought I had better see what all the fuss is about.


McCall's 6844 View B


I decided to make view B which is the longer length without the peplum as I thought this would be more work appropriate. I used a royal blue ponte de roma purchased from Lincraft when it was on sale for $10.49 per metre. 


I cut a size medium which has turned out slightly too wide across my shoulders, although I'm not sure I could get away with a small. 


It has nice shaping down the the side seams which is quite flattering, but looking at this photo it make my backside look huge.


The sleeves are very tight which makes it suitable to wear over sleeveless tops or very thin sleeved tops only.


As most reviewers advised, I did not interface the collar. It sits very well around the neck but then it just wants to flop forward. I tried to fix this by hand stitching it down at the hemline. This still makes it hang funny. I think I will hand stitch it down in a couple of more places further up towards the waistline.


Topstitching.
I added the top stitching around the collar as instructed, which anchors down the seam allowance and gives a nice neat finish on the inside. I also sewed the sleeves in flat.


Well...to tell the truth, I have been a little underwhelmed with this pattern. Maybe my expectations were a little high due to all the hype out there in the blogosphere?

But in saying that, I'm sure I will get a lot of wear out of this cardi and I just love the colour. I have already cut out View C so stay tuned for another review coming soon.


Happy Sewing

Saturday, 28 September 2013

Springtime Style Arc Nina Cardigan

I have made myself another Style Arc Nina Cardigan for spring.


Spring has sprung in Australia and I have been enjoying the sweet scent of the wisteria growing on our side fence. Thought it would be a pretty backdrop for my purple Style Arc Nina Cardigan. Style Arc are an Australian pattern making company based in Melbourne. I have made a few of their patterns and have been very pleased with them all and I have noticed lots of favourable reviews for Style Arc on Pattern Review as well. Check out Anne's blog Clothing Engineer for lots of reviews of Style Arc patterns.

Nina Cardigan


I have made this cardigan previously (pre blog) and posted a review on Pattern Review. This review has a lot more construction details and detailed photos.


I love the flattering front folds and draping of this cardigan. It has a very slimming shape which is great for my rectangular figure (not much of a waist).


For this one I used a light to medium weight jersey with a lovely drape. Not sure of the fabric content. I sewed this mainly with my overlocker and finished the hems using Lite Steam A Seam 2 and sewing with my twin needle. I did have one major blunder while overlocking the seams. When you use the overlocker you lose a lot of control over keeping the layers of fabric perfectly together. This resulted in the centre back seam being very badly matched with the waist seam. I didn't realise this until I had overlocked the entire seam and I was not going to attempt to unpick all that stitching. This bugs me to no end, but I have since found a helpful tip to avoid this problem over on Karen's blog Did You Make That. I will definitely be using this tip next time.


Hope you are enjoying sewing for the change of seasons...Autumn (or Fall) for the Northern Hemisphere and Spring for us "down under".


Happy Sewing