Showing posts with label Spotlight. Show all posts

Wednesday, 13 December 2017

The Year of the Sleeve

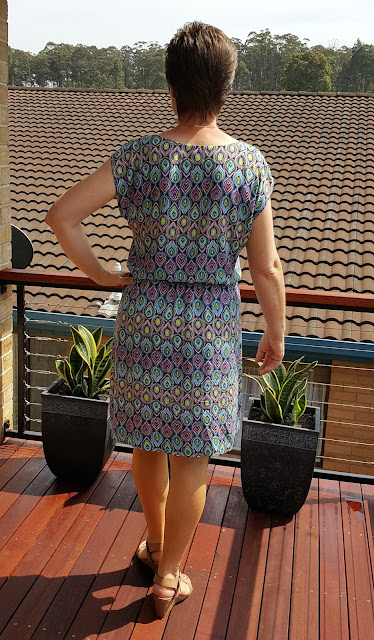
Fabulous sleeves of all shapes, sizes and design have featured heavily in the fashion scene this year. I have made Vogue 8945 to dip my toe into this fun trend.


I have had this pattern for over a year, and now I am kicking myself for procrastinating so long. Vogue rate this pattern as "very easy" and I would agree. On the pattern envelope it is described as a semi fitted dress, with neck and sleeve variations and a back zipper.

Vogue 8945
I made view B with the V neckline and the sleeve flounces, in a size 14. I love the fit of the dress. The back vertical darts give just the right amount of shaping and the front skims across the body without clinging to any bulges. It is quite flattering on my body shape.


The only alteration I made to the pattern was to only add one flounce, and instead of hemming the flounce, I lined it with the same fabric. This eliminated the need to sew a narrow hem and stopped the wrong side of the fabric showing, so was a great solution all round.


The fabric is a printed polyester georgette from Spotlight. I think this is the first time I have sewn with georgette and although it was a little tricky, it behaved quite well. I used a rotary cutter to cut the fabric and this resulted in quite accurate cutting, as the rotary blade does not lift the fabric like scissors can do. I used an invisible zipper and it turned out ok. It is a little wavy, but this busy leafy print is a great camouflage for any wonky sewing.
 

I stabilised the neckline with some narrow cotton tape which worked well, eliminating any stretching of the neckline. I used french seams to create nice neat insides and also because the georgette is a little transparent and I didn't want overlocked seams showing through. I didn't line the dress, but it was necessary to wear a slip underneath. The hem was hand stitched.


These photos were taken in a rush last weekend, just before we left home for my work Christmas party. I think this dress will get a few more wears this festive season. I'm loving those swishy sleeves and I'm thinking this pattern could be easily adapted to make a top too.

Happy Sewing

Jean

Tuesday, 18 April 2017

Style Arc Jema Panel Dress in Denim

Style Arc Jema Panel Dress
This panelled shift dress features a round neck and slight bell shaped sleeves. The panels offer a colour blocking opportunity or the panel seams can be frayed to create an exclusive look.

Style Arc Jema Panel Dress

I could not find any other Jema Panel Dresses on the internet, except for Anne from Clothing Engineer who has done an excellent review of this pattern which I found most helpful. The line drawing is not quite right. The proportions of the panels are different. I moved all the horizontal panel lines (except the top short front panel) down about 10 cm to better reflect the line drawing. I cut a straight size 12 and made no other alterations.


The fabric I used is a light weight denim from Spotlight. I decided to go with the frayed seam lines as a feature. The fringe is a light blue one way, and navy blue on the opposite grainline. I was careful to make sure the light blue fringe would feature on the vertical seam, and the navy fringe on the horizontal seams.


The pattern went together easily, a testament to Style Arc's great drafting skills. This dress was quite simple to construct and I would recommend it for a beginner seamstress. Anne from Clothing Engineer expanded on the technique of lapping the seams before creating the fringe which I found very helpful. I have included a photo of this step to show it clearly.


The lower panel's raw edge must be finished off to avoid fraying. (I overlocked mine). Mark a line 2cm from the finished edge. Mark a line 1cm from the raw edge of the upper panel that will be frayed. Now lap the upper panel over the lower panel, lining the raw edge up with the marked line on the lower panel. Pin and stitch along the line marked on the upper panel. Then stitch another line parallel to the stitching line.


Red thread was used for the entire construction of this dress, as I thought it would be a fun contrast, and I was too lazy to bother changing threads between sewing seams and top stitching. For the top stitching I used a triple stitch to make it stand out and I am really pleased with how this worked out.


I sewed this dress in a few stints over the Easter break and I found creating the fringe to be very time consuming, but I do like the effect. I opted to turn up the hem, and the sleeve hems and top stitch with two rows of triple stitch, rather than finishing off with a fringe.


I sewed the sleeves in flat, before sewing the side seams and sleeve seams all in one go. The sleeves eased in effortlessly. I only needed to run one row of gathering stitches around the sleeve head to ease it into the armscye. I eliminated the back neck opening as it was unnecessary and the neckline is finished off with a double inside binding and top stitched. I also added a decorative top stitch on the shoulder seams and the centre back seam.


After wearing this dress all day today, I am a little disappointed in how it has bagged out in the seat and is sticking out strangley at the lower front, probably due to me sitting all day at work. This fabric may have been a little too stiff for this pattern and a fabric with a little more drape may have worked better. Oh well, you win some, you lose some. Now onto the next project...

Happy Sewing

Jean

Wednesday, 1 February 2017

Style Arc Elsie Woven Overshirt in Polka Dots


Style Arc Elsie Woven Overshirt 
I have made the Style Arc Elsie Woven Overshirt. It's hot off the sewing machine last night and worn to work today. The perfect shirt for our unseasonably cool day of 20 degrees Celsius, compared to the day before yesterday when we experienced 43 degrees. 

Style Arc Elsie Woven Overshirt
From the Style Arc Website: This square shaped shirt features the trendy reverse revere, patch pockets and roll up sleeves. A must have shirt in your wardrobe for all seasons.


I made a size 12 without any alterations. The fabric is a navy and white polka dot rayon purchased from Spotlight back in November last year. Being rayon, it has a lovely drape which tones down the boxyness of this shirt, as described by Style Arc. However, it was a nightmare to cut and sew.


I decided to take my time, and sew in shorter stints over several days, to reduce the frustration. I was able to start each time with renewed enthusiasm. There was a bit of unpicking and resewing as that rayon seems to have a mind of it's own, but I'm glad I persevered and I am pleased with the result...not perfect, but good enough.


I am wearing it today with my Style Arc Elle Pants in navy stretch bengaline. These were made back in 2014 and are starting to look a little shabby. Must be time to make some more.


The Elsie has some lovely details. I particularly love the reverse revere collar. I used a lightweight fusible knit interfacing from Spotlight in the bands and cuffs, which worked very well with the rayon. I decided not to add the patch pockets as the rayon was a bit sheer and the polka dots showing through the pockets was not a good look. 


There is a box pleat at the centre back which creates the loose fit. The yoke is unlined, and does feel a little flimsy in the rayon. This could easily be remedied in any future makes.


The high low hem and side splits are very on trend and I love the backside coverage it provides. The hem was simply overlocked and turned up 1cm and top stitched (mitred corners). I did stabilise the edge with Bondaweb before top stitching and it helped a lot. Next time I would add to the hem to allow it to be turned up twice as it would give a much nicer finish.


I followed these instructions to sew the binding on the sleeve slits, which was excellent. Style Arc's instructions are really just an order of construction. I feel that they got this a little out of order, sewing the sleeve binding after the sleeve had been sewn to the body of the shirt and the side seams sewn. This was quite difficult, but would have been much easier if done while the sleeve was flat. So do step 11 after step 8 and before step 9.


One issue I did have with the Elsie while wearing it today, was that the sleeve tabs kept falling out of the sleeve slits. They do seem to be unnecessarily long...something I will change in the next one.


Overall, I am loving my new Elsie Woven Overshirt and I can see it going with several other garments in my wardrobe too.

Happy Sewing

Jean

Wednesday, 4 January 2017

Style Arc Adeline Dress #2


On Christmas Eve afternoon I got the silly idea to sew up my second Style Arc Adeline Dress to wear on Christmas Day. I did have a bit of a head start, as I had done all the cutting out and fusing the interfacing to the facings the night before. I thought it would only take a couple of hours as I had sewn it before here, but sadly I was a little over ambitious and I didn't finish it until 9pm and then I still had Christmas food to prepare. Anyway, all the stress has now been forgotten and these photos were taken yesterday in my mother's garden during it's second wearing, at a family New Year get together.


The fabric is a cotton linen blend purchased from Spotlight in a very colourful floral print. This fabric behaved very well and was a pleasure to sew and press. It was also nice and wide and I was able to eliminate the centre back seam. Also, wrinkling that is usually an issue with linen has not been a problem. I don't know the percentage of linen to cotton in this blend, but it wears very well with little wrinkling.


I made my usual Style Arc size 12 and I did make a couple of pattern alterations to this one in order to improve the fit. I shortened the length by 3cm at the lengthen/shorten line to give it a more summery vibe and I did a forward shoulder adjustment following this guide from Sew Hopeful.


The shoulder seam on the Adeline Dress is a relatively straight line. I removed a wedge from the front shoulder, 1.5cm at the sleeve edge tapering to nothing at the neckline. I then added this wedge to the back shoulder. This worked very well and the dress sits better on my shoulders, without wanting to slip back all the time. 


It is very important to stabilise the neckline to avoid any distortion or stretching. I did this by sewing some narrow cotton tape to the stitching line on the wrong side. It worked beautifully and the neckline sits perfectly. All the facings (neckline and hem) were under stitched and then top stitched so there is no problem with them flipping out or misbehaving at all.


The photo above was taken as I was attaching the patch pockets to the front. I posted this on IG, not knowing if I was going to be able to finish it in time for Christmas. I was very happy when I did manage to finish it in time as it was perfect for our Christmas Day weather and it was comfortable and stylish...but best of all, there was plenty of room for all that Christmas over indulging that tends to happen on Christmas Day.


I think I have a new favourite dress, and judging by the number of Adeline dresses popping up on my IG feed, it is becoming a very popular pattern. My darling grand daughter wanted to join in the photo shoot and this shot was just so lovely of her that I had to include it.

Wishing all my followers a wonderful 2017 filled with the joy of sewing.

Jean

Wednesday, 28 December 2016

Style Arc Olivia Dress


According to the Style Arc website: "A great every day dress to have in your wardrobe that is very easy to sew. The flattering extended shoulder line along with the elastic waist makes this dress suitable for different occasions. Dress it up with your favourite designer belt or use the belt pattern to create your own look in a contrast fabric.

Style Arc Olivia Dress

This pattern has been around for quite a while and there are many lovely versions out there in blogland. It has taken me a while to finally purchase the pattern and try it out and I have not been disappointed.


I used this pretty tear drop printed rayon from Spotlight, but it was a nightmare to get those stripes lined up before cutting. Even though I spent quite a lot of time pinning the fabric to ensure the stripes matched, it still managed to shift and not be as perfectly aligned as I had hoped for. Next time I will steer clear of any striped patterns, especially in shifty rayon.


The only alteration I made to the pattern was to add an extra 1.5cm to the bottom edge of the bodice and the top edge of the skirt. I wanted to make sure there was plenty of fabric to be able to overlock the raw edges of the elastic casing with ease. This worked out very well. Some people have commented that the arm holes are too low and their bra is exposed, but I did not have this issue.

The bodice is maybe a little too blousey at the back, and could benefit from a little shortening. This may be due to the extra length I added to accommodate the finishing of the casing. I will need to think on this before I make another one.


I didn't make the belt included with the pattern. This narrow gold belt worked quite well with it. The neckline facing was top stitched down so there are no issues with it flipping out at all. The dress turned out very long and I ended up turning up a 5cm hem twice to achieve this length. This gave a nice weight to the hemline too. These photos were snapped in a hurry on Christmas Eve morning as we were about to head to the shops for our last bit of Christmas grocery shopping. It was cool and comfortable in the rayon and I would recommend this pattern as a nice simple wardrobe staple. Many different looks could be achieved depending on fabric choice and I think this would work well in a knit fabric too.

Happy Sewing

Tuesday, 13 December 2016

Style Arc Kate Dress in Leopard Print

Style Arc Kate Dress
This is my third Style Arc Kate Dress. You might say I like this style. A classic wrap dress is flattering on most figures and they always makes me feel all feminine and girly when I wear my Kate dresses. You can see the others here and here.

Style Arc Kate Dress
I did simplify the pattern a little, by eliminating the tucks in the front by cutting the side without the tucks as a pair. I found in my first version that sewing the tucks was tricky in a slippery poly knit and they were not really necessary.


I added 3 cm of length to the bodice area to lower the waistline and kept the length (including the extra 3 cm). The waist ties were lengthened so that they would be long enough to go right around my waist and tie at the front.


I was planning to have short sleeves but after cutting them out I realised that they were a little too close fitting for short sleeves. I will try short sleeves next time, adding some extra width to the pattern before cutting out. I kinda like how these "just above the elbow" length sleeves turned out anyway, and they are fine for my cold air conditioned office at work.


The fabric is a poly/spandex knit in a leopard print, from Spotlight in Queanbeyan and they still have some available, or they did last Friday when I called in. (I love it when I have to drive to Canberra for a work meeting, and the route goes right past Spotlight in Queanbeyan. I usually take full advantage.)


The neckline was finished off with some self fabric binding turned to the inside and secured with a twin needle. I used Bondaweb on all the hems which eliminated skipped stitches and tunnelling when I sewed them with a twin needle. It makes such a difference when working with these slinky poly knits. 


I'm pretty happy with my new dress and I have worn it to work twice already.


Happy Sewing

Friday, 2 December 2016

Style Arc Hazel Dress

Style Arc Hazel Dress

This Style Arc Hazel Dress was actually made way back in May. You may have seen a sneak peep during Me Made May. I think I only got to wear it once before the weather turned cold, so it has taken until now to get some descent photos for the blog.

Style Arc Hazel Combo
From the Style Arc website: "This cocoon-type dress is Style Arc’s take on the exciting new oversized shape of this season. We’ve provided so many options for you with this pattern. Make it with or without sleeves. Make it with or without hidden pockets. You can even choose to make it as a top!"


I chose to make the dress with the sleeves and I also included the pockets. The fabric came from Spotlight. It was some sort of knit, not as heavy as a ponte, had a nice drape and not too much stretch. The two tones are actually the right and wrong sides of the fabric. I decided to use both sides of the fabric to add interest and highlight the design lines of the dress.


The neckline, hemline and sleeves are finished off with a facing. I initially tried to hand stitch the hem facings, but they looked terrible in this fabric, so I resorted to using the twin needle which gave a much better result.


The sleeves are very "bat wing" shaped. This is a bit of an issue if you need to raise your arms above your head as the whole dress lifts up and you can reveal far more than is socially acceptable. The shape of the sleeves also restricts what you can wear over it. I have no cardigans or jackets that would work with this style. I found that the dress tends to slip back off my shoulders, when sitting and the front neckline rides up and chokes me. This may be due to my forward sloping shoulders? but is quite annoying.


I like the look of this dress, but I do find it annoying to wear due to the reasons mentioned above. Not sure if I would make it again.

Happy Sewing