Showing posts with label Bargain Box Fabrics. Show all posts

Wednesday, 25 February 2015

The Skirt Experiment (aka Simplicity 2451)

I have been deliberating about whether to do a post about these skirts for quite a few weeks. However, this blog is about documenting my sewing journey and that includes everything, not just the things I am really happy with. I'm sure we all have those disappointing moments when things don't work out quite as we had planned.

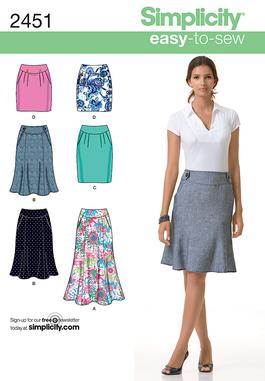
I have had Simplicity 2451 in my pattern stash for a while now, purchased from Pattern Review during one of their great pattern sales.

 There are 74 reviews of this pattern on Pattern Review and it has been quite popular, so I had high hopes.

Simplicity 2451 View B
My mother had given me this beige fabric (of unknown composition - probably some sort of synthetic with a nice drape) that she had originally purchased to make a pair of pants. It had been stored for several years and had a few areas damaged by mildew, but I was able to cut the skirt out without using the damaged areas of fabric. I traced off a size 14 and graded the waist up to a size 16. This is where I went wrong. The waist is actually a bit roomy and doesn't hold any tummy bulge in, yet the fit is too tight in the hips, causing some unsightly wrinkling.


The fit across my behind is way too tight for my liking revealing the lines of my underwear. I used an invisible zip instead of a lapped zip as the pattern instructs and I do like the curved yoke in place of an actual waistband. I skipped the decorative side tabs as I always intended to wear this skirt with a longer top, so they would never be seen.


I also like the flared shape of the skirt. It feels quite swishy. After taking these photos I unpicked the side seams and made a bit more room across the hips.


I also made view C with the same pattern alterations.

Simplicity 2451 with Maria Denmark blouse
This style fitted much better through the hips but was a bit loose at the waist.

Simplicity 2451 View C
I purchased this fabric from the discounted shelf at my local Bargain Box fabrics for $5.00 a metre. It is a fairly loosely woven cotton that unfortunately bags out in the seat after a few hours of sitting.

Pockets and pleats almost invisible in this print.
Although it is very difficult to see in this print, I stitched the pleats down for approximately 3 cm so they didn't cause too much poofiness. I have enough natural poofiness in this area.

Back of View C
Again, I used an invisible zip and there is a vent in the back as well, which makes it comfortable and practical.

Although I have been a little disappointed in both these skirts, I have learned quite a bit, and I would like to try making this pattern again. I just need to remember that the waistline in this skirt is quite generous and does not need grading up. Also, View B is very fitted in the hips/upper thigh area and I may need to add some width here. Fabric choice also has a significant effect on the resulting fit and loosely woven fabrics are not suitable for fitted skirts. Now, onto some more successful sewing.


Happy Sewing

Monday, 26 January 2015

An Edith Dress for Jungle January

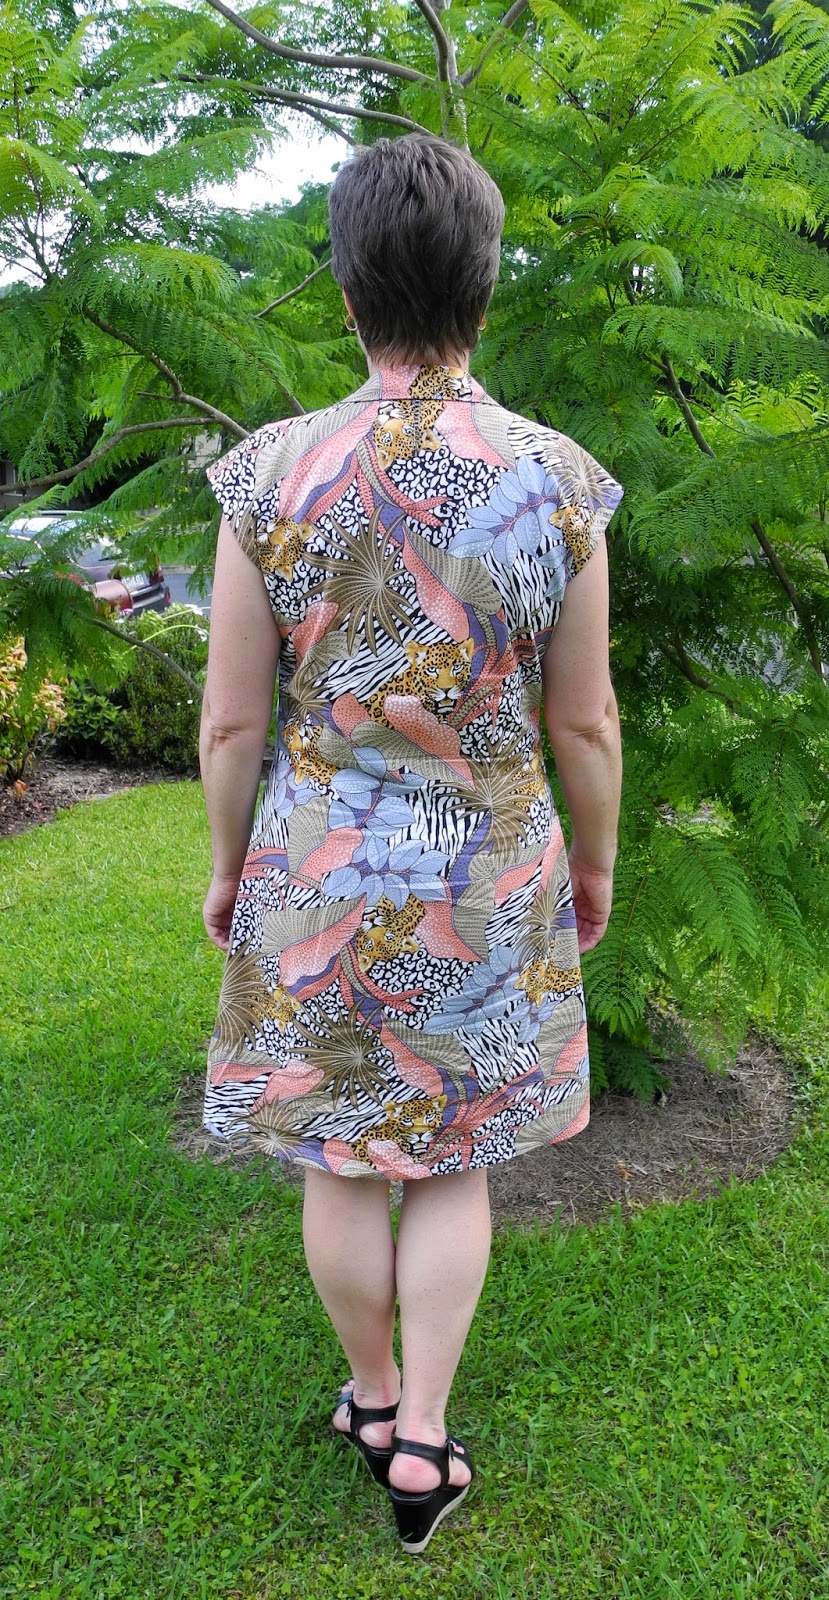
After my initial attempt at the Edith Blouse and Dress pattern by Maria Denmark here I was enthusiastic to try again with a few changes. I purchased a jungle inspired print from the bargain shelf at my local Bargain Box Fabrics for only $5.00 per metre. It was some sort of cotton? I think, with a lovely drape. Perfect for Jungle January.


As I noted after making the blouse, I made a few changes to the pattern. Firstly, I retraced the pattern in the bigger size B44 ( and added 1.5cm seam allowances). I hope I didn't mislead people in my last post regarding the sizing of this pattern. I think the pattern corresponds well to the sizing chart, I was just in denial about my actual size. As a side note regarding fabric requirements, Maria only provides fabric requirements for 140cm wide fabric. I used 112cm wide fabric and I cut the blouse easily out of 1.5m and the dress out of 2.5m. (This did not allow for making bias binding).


In order to address the issues of the bust darts being too high and the armholes being too small I did a very simple alteration to the pattern pieces. I simply slashed the pattern horizontally above the bust darts and through the armholes and spread it by 2cm.


I also cut off 7cm at the hemline to allow the hem to finish above my knee. 


I am really happy with the fit now. 


Sorry about the wrinkles but these photos were taken after wearing the dress all day at work.


I did have enough fabric to make some bias binding to finish off the sleeves. 


The darts at the back shoulder create a nice fit.


I used white thread for the construction and top stitching. I did think about using black thread to sew the buttonholes because I was using black buttons, but I am glad I went with white as they are quite unobtrusive and disappear into the print of the fabric.


I turned the hem up 1.5cm twice and top stitched. This is a really comfortable dress and I am so glad I tweaked the fit to make it work for me. Well worth the effort.

This jungle print is certainly something I wouldn't normally wear...not really my colours, but I am pleased with the finished result. I already have another Edith cut out in a completely different fabric for a totally different look, and I have a few more blouses planned as well.


It has been fun to participate in Jungle January too.

Many thanks to my daughter for taking these photos for me.


Happy Sewing

Saturday, 24 January 2015

Maria Denmark's Edith Blouse: A Wearable Muslin

After admiring the Edith Blouse and Dress out there in blogland, I have finally had a go at making my own. I loved Paola's dresses at La Sartora here and here and Heather's blouse from Handmade by Heather B here. Let's just call this a wearable muslin.


This is a PDF pattern, but I must say the pattern tiles fitted together much better than any other PDF patterns I have tried. My only gripe being that you have to add your own seam allowances. I found this just another tedious step that certainly added a lot of time to the process. You have to print the pattern, tape it together, trace off the required size and then add seam allowances. I don't understand why they are not added in the first place. Imagine how many hours are wasted if you added up the time it takes each individual person to complete this extra step, when it could have been included in the pattern. As you can probably tell, I was very annoyed.

Anyway, getting back to the blouse...the style really appealed to me. Fitted, but not overly fitted and no sleeves to set in. I thought this would make a great blouse to wear to work.


I thought I would start with the blouse to get the fit sorted, before I tried the dress. I bought some cheap pink poplin from my local Bargain Box Fabrics specifically for this and I cut a size B42 with 1.5cm seam allowances. I did add 5cm extra length at the hemline because I prefer to wear my tops a little longer. After sewing all the darts (8 in total) I decided I would just machine baste the shoulder and side seams to check the fit. I am so glad that I had the forethought to do this because it sure made the unpicking a lot less painful. This size was way too small. I don't know what I was thinking when I cut this size. Maybe I was thinking it would be like the Big Four patterns which have loads of unnecessary ease. I almost binned it at this stage until I realised I had added quite generous seam allowances so maybe it could be saved. I proceeded, with a new determination to make it fit.


After unpicking the basted seams, I scooped out about a cm from the bottom of the armhole as these were very tight. The shoulder seams were re sewn with a scant 6mm seam allowance which effectively added another cm of room to the length of the blouse. I decided to finish off the sleeve hem with some purchased bias binding. (I didn't have enough fabric to make matching bias binding). I did this step before sewing the side seams. The curve at the bottom of the armhole is quite tight and I thought this would be quite difficult to attach the bias binding in the round. Then I sewed the side seams with a scant 6mm seam allowance, effectively adding another 4cm of room to the width of the blouse. I was careful to line up the seam evenly at the underarm to create a nice neat finish. To stop the seam allowance peaking out at the underarm, I fold the tail of the overlocking threads under the seam allowance and then stitch the seam allowance down for about a cm to keep everything in place.


Another quick try on and I decided I could definitely make it wearable. This is actually quite an easy blouse to sew. None of the techniques required are terribly hard and I was enjoying the sewing process. I attached the collar and the facing and all was looking good. I must have started to rush as I could see the end in sight...a bit like a horse bolting for home, because I got careless. 


I was grading and clipping the seam allowance after attaching the facing...snip snip snip *#%@! I had snipped two little slits in the back of the blouse. I had invested too much time and effort into this blouse to abandon it now. What to do??? The slits were right at the top of the back of the blouse, almost covered by the collar on the outside and totally covered by the facing on the inside. My solution was to iron a small circle of fusible interfacing over the slits on the inside. So far they have held together and it has been through the wash twice now.


I made the buttonholes as close to the edge of the front as possible and positioned the buttons to provide as much room as possible. When sewing the hem I curved it up at the side seam. I thought this would look more flattering than a straight hem all the way around. The fit is still a little too close. The bust darts are too high but it's passable...a wearable muslin.

I have a renewed enthusiasm to try this pattern again. Notes for next time: 

  • Cut the larger size
  • Add 2cm length to blouse by cutting and spreading approx halfway between shoulder seam and top of front darts. (Do this to front, back and facing pattern pieces).This will do two things: lower the darts by 2cm and add an extra 2cm to the armhole depth.
  • Add 3cm of length at the hemline.
  • Curve hemline up at side seams.


Looking forward to making a much better fitting Edith soon.

Happy Sewing

Monday, 1 December 2014

Anne Klein Shift Dress

I have made a colour blocked shift dress. This is Vogue 1382 designed by Anne Klein. 


I have been wanting to try this pattern for a while now after seeing a few others around that have inspired me. Sue from FadanistaKnitting Jenny and Binding Off have all made lovely versions. I have been trying to choose patterns that suit my figure rather than just making patterns that appeal to me.

Vogue 1382 Line Art
According to the pattern envelope this is a semi fitted, lined dress (fitted through bust) has yokes, side front seams, pockets and invisible back zipper. It is classed as easy and is suitable for all figure types.


I cut a straight size 14. The only alteration I made to the pattern was to add 4cm to the length at the hemline.


The fabric is a linen/cotton blend in natural and khaki, purchased from Spotlight at Rockingham on my recent visit to Perth. The lining is a mystery 100% cotton purchased from Bargain Box Fabrics in Batemans Bay. This is the first time I have sewed with linen and I love it. It pressed beautifully and was very easy to work with. These photos were taken after a day at work in the office and it hasn't creased as badly as I was expecting.


After taking this dress for a wearing test run at work today, I have decided it is a little too snug around the hip/bottom area. When sitting it really rides up (especially in the car) and there was a lot of strain put on the centre back seam around the seating area.


The photos above show the details: the seams have been top stitched where the contrasting fabrics join; the pockets have been top stitched (the pattern instructions said to hand sew the pockets to the dress?) and the invisible zip at centre back (notice the strained seam at the lower centre back).

For next time I think I might cut size 14 in the neck/shoulder area and grade up to a size 16 below the armsceye to give me a little more wiggle room. 


The dress is fully lined with 100% cotton. I thought this would be cooler for the summer than a slippery poly lining. I really out smarted myself and made a terrible blunder during the construction of this dress. I was determined to eliminate any hand sewing and attach the lining entirely by machine...but I rushed ahead without fully thinking it through. I inserted the zip in the centre back and finished the centre back seam. Then I joined the front to the back at the shoulder seams. Then I sewed the lining together at the shoulder seams too. Next step was to attach the lining to the dress (all the side seams are left open at this stage). I sewed the lining to the neck and armholes and also to the zip. The seam allowances were graded and clipped and under stitched.I was super pleased with myself and proceeded to turn it all right side out through the shoulder. After a lot of pulling and wriggling I got it all pulled through...only to find that I was right back where I started, with an inside out dress.

It was late at night and I was tired and not thinking straight so I put it aside till the following night. After a bit of googling, I realized my mistake. You must have three seams open for this to work. My mistake was that I had sewed the centre back seam (and inserted the zip). I think if I had left this seam open it would have worked. I think the centre back seam should be sewn after the dress has been turned right side out. Anyway, I will be referring to this post before I attempt this again.


In order to fix my dilemma, I worked out that if I unpicked the shoulder seams of both the dress and the lining I could turn it right side out. After some very tedious unpicking (remember I had graded and clipped and under stitched) I made it work. Such a relief! I then proceeded to resew the shoulder seams by hand. This was quite fiddly due to the seams being graded and clipped, but I was saved by this lovely fabric that presses so beautifully. 

Despite all my troubles with the construction of this dress, I feel that I have stretched my sewing skills and learned a lot. I am quite pleased with the standard of finishing that I achieved on this dress and I am so glad that I figured out how to make it work. 

Unfortunately, I just don't really like it on me. I think it is the colour. I am usually drawn to bright colours and this dress is just a little too drab for me. Anyway, I would like to try it again maybe with a looser fit and some brighter colours.


Happy Sewing 

Saturday, 28 June 2014

White Coco

After falling in love with all the "Coco's" popping up on so many sewing blogs, I finally weakened and bought the pattern. Here is my test version:

Coco by Tilly and the Buttons

I just love the whole flattering shape of the Coco and the funnel neck is such a fun retro detail. I used some sort of cotton sweater knit that I purchased on sale from Bargain Box Fabrics for $3.00 per metre. This fabric had only a small amount of stretch and almost zero recovery so I had to make allowances for this.

Front View

Based on my bust measurement I made a size 5 with no alterations. I was very pleased with the fit and I wouldn't change anything for my next one, except for the length. I think it is a little too short for me, but would be fine on you younger girls (I am 5 foot 7 inches tall).

Back view

This fabric had a nice amount of drape and hangs quite nicely. To avoid stretching out too much I added some clear elastic to the neckline and the sleeve hems which has given them some much needed stretch recovery. I used some purchased cotton bias tape at the hemline for two reasons: 1. so I didn't have to lose too much length when turning up the hem and 2. to add stability to the hem and avoid stretching out when sewing the hem. This worked really well. 

Sleeve hem

All the hems were stitched using a twin needle, although this detail is difficult to see on this fabric.

Funnel neck detail

 The funnel neck was such a cute feature and so easy to do. Due to fabric constraints I had to cut my funnel neck in two pieces. I measured the length of the front and back necklines on the stitching line and then added seam allowances and cut my funnel neck as two pieces, one front and one back, so that the seam lines matched the shoulder seams.


I will have to wait for the weather to warm up before I get any wear out of this dress, but I have a few ideas for a warmer version, now I know it fits.


Happy Sewing

Saturday, 28 December 2013

My Blue Anna Party Dress

I needed wanted to make a party dress to wear to my work Christmas Party this year. Luckily, this coincided with the Cocktail Outfit Contest on Pattern Review and I had just stumbled upon this gorgeous blue flocked taffeta at my local Bargain Box fabrics. Recently, I had completed my Floral Anna Maxi, and I wanted to try this pattern in a completely different fabric, so everything just kind of fell into place.


I decided to go the extra mile and stretch my sewing skills while making this dress. I opted to include the front split, although I chose quite a conservative length to be more age appropriate. (I kinda wish I made it a little bit higher now, because it is hardly even noticeable unless I stick my leg right out).


The bodice is completely lined which eliminated those annoying facings and I used french seams on the skirt panels.(This is the first time I have sewn french seams). I hand stitched the hems on the front split and I also hand stitched the seam allowances down on the centre back seam (because this seam had to be pressed open due to the invisible zip). I also hand stitched the hem on the skirt and the bodice lining at the sleeve edges and the waist line.


Here are some closer details:


Front tucks match skirt seams
Invisible zip with hook and eye at the top.
And now for the gory details:


Bodice lining
I attached the bodice lining to the neck line and invisible zip as shown in this tutorial from Sewaholic. This makes a nice neat finish. I also under stitched the bodice lining at the neckline to stop it rolling out.


Inside back bodice and skirt.
Inside side front showing seam with split.
Hand stitched hem on front split.
Hand stitching seam allowance down on centre back seam.
I made a few more changes to the By Hand London Anna Dress pattern from my floral version. I used the same bodice with the alterations I had already made, then changed the neckline from the V neck, to the slash neckline. I lowered the neckline by 4cm at the centre front, curving it back to the original line at the shoulder seams. I also took out a wedge of 2cm across the back just above the waistline, tapering to nothing at the side seams. (My floral Anna was a bit too long at the back).

This is how I did my french seams on the skirt panels:


Sew seam, fabric wrong sides together. Use width of presser foot as a guide.
Trim off half of seam allowance. Press seam allowance to one side. Open out fabric and fold back over seam allowance and press.
Sew seam again (using width of presser foot as a guide), this time with right sides of fabric together and seam allowance encased in seam.
I found this method worked out perfectly with 1.5cm or 5/8th an inch seam allowance. Although my presser foot is slightly less than half the seam allowance width, this allows for turn of cloth.


I have already worn my "Cocktail Outfit" to my work Christmas Party and it was a hit. I received some lovely compliments, and had a fabulous time. Hope you are all having a happy festive season, and are managing to squeeze some sewing in too.

Happy Sewing