Sunday, 26 October 2014

My Archer of Tribulation

I have finally finished my second Archer Button Up Shirt by Grainline Studio. This was my Archer of tribulation. I had difficulties at every stage, and it is nothing short of a miracle that it has reached completion and is not laying discarded in the corner of my sewing room.


I blame most of my issues with this shirt on my fabric choice. I wanted a fine gingham so that I wouldn't have to be too careful with pattern matching. Unfortunately, the only fabric available in the fine gingham at Spotlight at the time, was a poly/cotton blend. I think it was 80% polyester and 20% cotton.

My first issue was with the fusible interfacing. I just used the same interfacing that I always use, purchased from my local Bargain Box Fabrics. They sell two types of fusible interfacing...a cheap and nasty lightweight interfacing, and a cheap and nasty medium weight interfacing. The minute I fused the interfacing to the fabric the fabric wrinkled and bubbled and shrank. I had to re-cut the collar. I did some testing on scraps but I couldn't stop the bubbling effect. In the end I decided to underline the collar and cuff pieces with another white poly/cotton fabric I had left over from another project which didn't wrinkle and bubble when I fused on the interfacing.


This fabric did not like to be sewn. The seams puckered and I had terrible trouble getting them to lie nice and flat. For this reason I decided not to faux flat fell the seams. I just finished them off with the overlocker and left good enough alone. You can see in the photo above there is something weird going on with the yoke. It wants to pull up in the centre and is creating a fold of fabric at the base of the neck. I didn't have this issue with my first Archer which I made out of a cotton voile, so can only attribute this to the fabric.


I did make a couple of minor changes for my second Archer, based on what I learned during the construction of my first one. I cut a size twelve, as before, but I cut the sleeves in a size 8. These fitted perfectly into the armsceye and are a much more pleasing width and length. I also added 5cm (approx 2 inches) to the length of the front and back, at the waistline. To try and take away the boxy shape of the shirt I tapered the side seams slightly by 1cm (approx 3/8ths of an inch) at the waistline curving back to nothing at the armsceye and hemline. I am pleased with the shape of the shirt now, still loose but a little more figure flattering.


Two piece undercollar and collar stand
As you can see I didn't give any thought to pattern matching the two piece under collar which is a bit of a shame because it would have looked really good. Must keep that in mind for the next one. Due to underlining the collar and cuff pieces there was quite a lot of bulk in these areas. Luckily my trusty Bernina powered through all the layers without a problem.


Angled cuffs
I think the angled cuffs are a nice feature. I sewed continuous plackets as instructed in the pattern but they puckered terribly. I did the best I could and tried to press the puckering out but I didn't have great success.


Pockets
The pockets also gave me grief. When I pressed the pockets before attaching them, the fabric skewed strangely. At least they did this symmetrically. I was really worried that this would be very obvious and ruin the look of the shirt, but I don't think it is too noticeable if you don't look too hard. The last job was the button holes and buttons. I had every confidence that this would go well as my Bernina has an automatic buttonhole foot and setting so that once you set the button hole length it will reproduce identical button holes over and over. Well, how wrong I was. I think I spent about three hours on these button holes and I unpicked nearly as many as I sewed. The fabric puckered so I started using a tearaway stabilizer on the back which eliminated the puckering. Then my button holes were sewing with each side offset from the other by a few mm each side. I got very good at unpicking buttonholes. In the end, I started again and reset the buttonhole length. This, combined with the tearaway stabilizer worked a treat and I was able to go ahead and complete the remaining button holes without a hitch.


Despite all my problems during the construction of this shirt, I am glad I persevered and finished it. Probably not my best sewing but at least it is a wearable garment and I have learned never to bother making this in a poly/cotton again. Next one will be a nice soft cotton shirting or maybe a linen.


Happy Sewing

Friday, 24 October 2014

Mosaic Print Fay Skirt

I have made another Style Arc Fay Skirt. You can see my first version here


For this one I used a scuba knit with a lovely mosaic print in navy and white. This is one of the lovely fabrics I purchased from Spotlight on my birthday. I hadn't ever sewed with scuba knit before so this was a new experience. It is quite thick and stable like a thick ponte knit, only it has a lovely smooth, almost silky surface.


The fay skirt is a double layer of fabric. There is only one pattern piece which is cut twice. The side seams are sewn creating a long tube which is then turned inside itself with the raw edges finishing at the waistline. Elastic is attached and turned over creating the waistband. There is no hem.


This double layer of scuba knit has certainly made this a nice warm skirt. This skirt is super quick and easy to make and it has a lovely shape.


The picture above is a close up of the beautiful mosaic print.
I have worn this several times already and it has been a favourite for date night, dressed up with this white RTW cardigan, high heels and pearls.


I have been a bit lazy lately, sewing very easy garments but I love the instant gratification. Better move onto something a little more challenging.


Happy Sewing

Monday, 20 October 2014

Tilly's Coco at the Beach

I have made another Tilly and the Buttons Coco Dress.


For this one I made a slight alteration to the lower half. I slimmed down the side seams below the waistline using the shape of the Style Arc Kristen Dress. Also, I used the SA Kristen Dress pockets (they are bigger than the Coco pockets). 


As I did for my first Coco, I cut a straight size 5 based on my bust measurement. I did add a little extra length to make it more age appropriate.


The fabric I used for this Coco was a great quality navy and white striped ponte. It was quite hefty and provided a lot more structure than the fabric I used for my first Coco. I purchased this fabric from Spotlight at Nowra, NSW back in July**. 

Funnel Neck
I made the funnel neckline again. I love this feature. I decided to run the stripes vertically to provide interest. I wanted to add some gold buttons with a nautical theme but couldn't find anything like that locally. I ended up choosing these red heart shaped buttons which add a splash of colour. I may change them if I find something more suitable.

Pockets and cuffs
I cut the pockets and cuffs with the stripes running vertically too. I think this helped break up the horizontal stripes and looked better. The ponte had limited stretch so this was not a problem.


I love this Coco and I have worn it numerous times already. I just throw it in the washing machine, hang it on a coat hanger on the clothesline to dry, and then straight back in the wardrobe (no ironing required). This ponte is great quality too and has not pilled at all.

All photos were taken down at Denham's Beach (South Coast of NSW) by my son, who was home on a short break from Uni over the weekend. (I wanted to take these photos on the beach but I was dreading taking the tripod and remote to such a public area. I'm a little self concious and like the privacy of my own yard.) Jesse was very obliging, even posing for a photo himself.


**We called in to Spotlight at Nowra NSW on our way to Sydney for my "Surprise 50th Birthday Party"  (of which I was oblivious of at the time). My partner (now husband) was being very kind and allowed me to spend a good hour and a half fabric shopping, with very little complaining. This was a real treat for me as I rarely get to shop in real fabric shops (most of my fabric shopping is done online). I managed to spend quite a bit of cash and the cashier declared that I had saved almost $100 on my purchases, because I had a VIP card. I was almost afraid to ask how much I owed. Anyway, I now have some lovely fabrics and lots of plans.

Friday, 17 October 2014

Kielo Wrap Dress Refashion

A few months ago you may remember that I made the Kielo Wrap Dress by Named patterns, in a winter version using a charcoal grey ponte. See blog post here. Although I was happy with the dress, I just didn't love it on me. I have a rectangular shaped figure and I felt this dress made me look like a brick. All those ties wrapping around my waist just added bulk. It has been languishing in my wardrobe taking up valuable space, so I decided to make it more wearable for me.

Kielo Wrap Dress refashioned
My refashion was very simple. I unpicked the side seams and removed the waist ties. Then I used my trusty shift dress pattern piece, to recut the side seams and hemline. (This is a frankenpattern of the Tilly and the Buttons "Coco dress" and the Style Arc "Kristen dress")

Pattern laid out to recut side seams
The neckline and armholes remain unchanged. I also left the armhole darts in place.

My new shift dress
The back darts remain unchanged.
Worn with a belt in an attempt to create some waist definition.
I must be happy with my new dress as I have worn it to work several times already. Much better than languishing unworn in the wardrobe. It's great to layer with a bright cardigan (Style Arc Nina made pre blog) and easy to dress up with a simple scarf. This is how I have worn it to work:


I really must attempt this refashion thing more often. I have some near new men's tees that could be made into something else if I put some thought into it. There is so much inspiration out there in blog land.

Happy Sewing

Saturday, 11 October 2014

Tropical Scout Woven Tee

 
Grainline Studio Scout Woven Tee with sleeves lengthened.
This is my fourth Scout woven tee from Grainline Studio. I have gradually been tweaking the pattern to suit/fit me and I am pretty happy with the fit I have achieved with this one. The neckline sits beautifully and it fits well through the shoulders. I have added length to the front and back so that it finishes at a more flattering level on my figure. I have also added some shaping into the side seams to take away the boxy shape. This is still easy to slip on without any extra openings. You can see my previous Scout posts here FirstSecondThird


I used a pretty tropical printed rayon purchased from Spotlight. For this one I lengthened the sleeves, following the tutorial from Grainline Studio here. It was a very easy alteration to do and creates a different look and makes it more trans seasonal.

Ollie was watching me through the window.
As you can see I have made another pair of Style Arc Elle Pants, this time in white stretch bengaline purchased from Style Arc. I made no alterations from the last time I sewed these pants. I have previously made black, navy and teal green Elle pants and they have proved to be real work horses in my wardrobe. I'm sure these will not be the last pair I make.


That's the problem with taking your own photos. There is no one to tell you to pull your pants down to smooth out those wrinkles.


This outfit was an easy sew and a practical and comfortable addition to my wardrobe.


Happy Sewing

Saturday, 4 October 2014

The Wedding Dress that Never Happened

It was with great excitement and anticipation that I began the planning of my wedding dress, several months ago. After hours of trawling pinterest, pattern review and endless google searches, I decided I really wanted to stretch my sewing skills and create a very special dress for such a special event.

I took advantage of the pattern sales on at the time and purchased several contenders. 


Initially, I was set on making Vogue 1030. After I ordered the pattern, but before it arrived, this post from Poppykettle popped up. She had used this very pattern for her bridesmaids dresses. This post was quite enlightening as she shared the whole process of creating this dress twice, and it wasn't without considerable drama along the way...I think she scared me off using this pattern, even though her dresses turned out beautifully in the end.

So I went on to plan B, consulting my mother for advice. The next pattern I considered was Simplicity 1909 view C. When I showed my mother she so tactfully pointed out that it did look lovely on the very slim model (but maybe not on so good on a middle aged woman with a thickening waist) Don't you just love Mothers...but she was right.

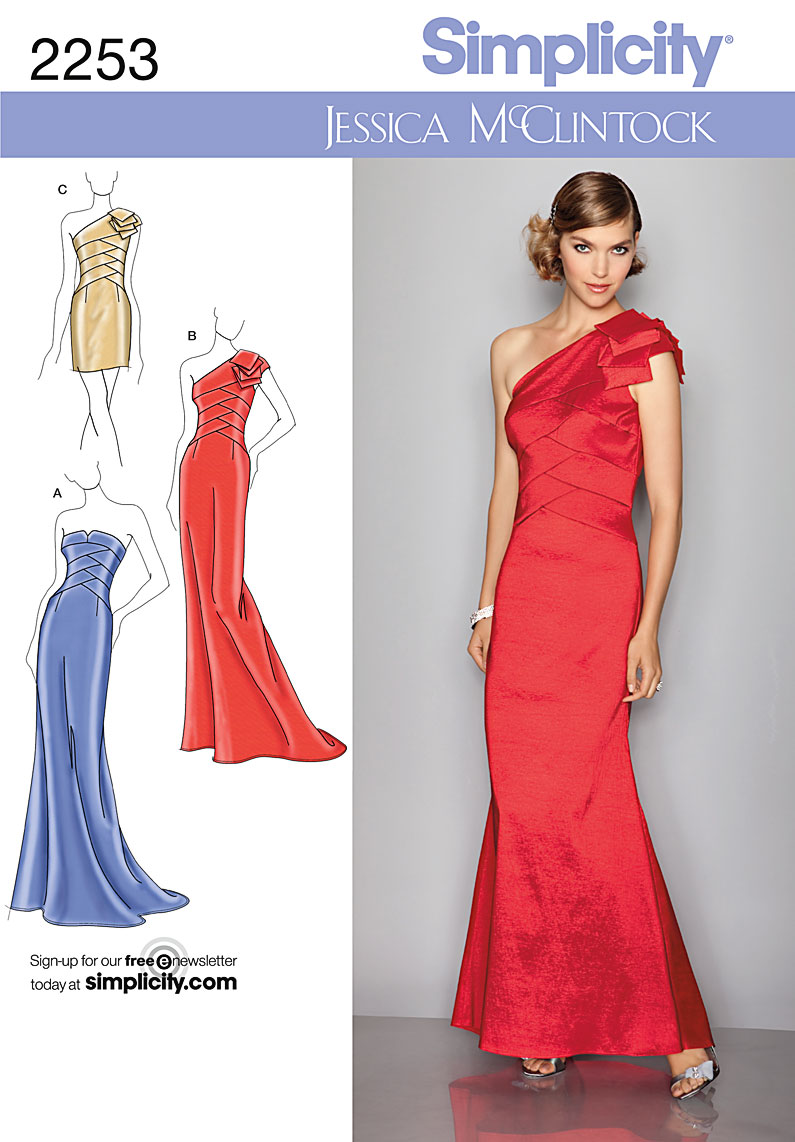
Finally I settled on Simplicity 2253, a Jessica McClintock design.


I loved the seamlines in the bodice and the elegant skirt with a slight train. I decided to make a muslin to try it out and get the fit right. I used a cheap poly suiting that I had in the stash, which had a lovely drape, and I underlined it with an old flannelette sheet.

Tuck pinned out at neckline, ready to transfer to the paper pattern.

Roughly pinned on the dress form after being shoved aside for weeks.

I only needed to make a few minor tweaks to get the fit right. The next drama was sourcing suitable fabric. I agonised over what colour to get. I had something pastel in mind in cool green/aqua like tones. I live in an area that is a complete dressmaking fabric void. Therefore, I had to resort to online shopping, and from experience, this is always a bit of a gamble. 

After having no success in Australia, I decided I would be brave and try Mood Fabrics. I love their website. It is so easy to navigate with great pictures of so many beautiful fabrics. I decided on a beautiful Silk Crepe Back satin called Dewkist, with a matching China Silk lining. I ordered it and my credit card was debited almost immediately. I stipulated on my order that I required it three weeks from the time of order. And so began the wait. Well to cut a long story short, after several emails were exchanged and almost five weeks had passed since I had placed the order, my fabric had still not been shipped. I was getting extremely stressed as my sewing time was disappearing fast, as our Wedding date was approaching quickly. I suddenly realised this was ridiculous. This was supposed to be a happy and exciting time leading up to our marriage, and it was turning into a nightmare. That's when I decided I was not going to let it ruin my special day. I cancelled my fabric order and was reimbursed in full, no questions asked.

Then, I am sad to say, I broke my RTW fast. I went on a wedding shopping day trip to Canberra, taking my mother with me for her invaluable advice. We had a great day and I found a suitable dress and got a bargain as it was half price. In fact, it cost less than half of what I was paying for the fabric from Mood. As soon as I had settled on the dress, everything else just fell into place.

I did do a little wedding related sewing. I made my own wedding garter which was a bit of fun. There are loads of tutorials on the internet with various ways of going about doing this. I got the general idea and then adapted it to suit the lace and ribbon that I had.


I ordered silk flowers from Bloom Room Designs as we were travelling away to get married, and it was difficult to organise fresh flowers where we were going. So I had to work out how to pack the flowers for our trip. The box they came in was too big for the suitcase, so I decided to make a large tote bag that the box would fit into. They were very lightweight, so carrying them wasn't a problem. I was able to take the tote on our flight as carry on luggage and it just fitted into the overhead compartment in the plane perfectly. The fabric I used to make the tote was actually a lovely brocade bed valance that had been sitting in my linen cupboard for the past ten years, unused. I was very pleased that I had finally found a use for it, and the colours toned in beautifully with our wedding theme. I even lined it with the cotton fabric part of the valance that is usually sandwiched between the mattress and the bed base.

Brocade fabric from unused bed valance.

Handles made from purchased cotton webbing.

This is how the box containing our silk wedding bouquet and buttonniere fitted in the bag.

I will leave you with a few wedding photos, even though the dress was purchased from Events Clothing, not made by me. 


(Greg and I took all the wedding photos ourselves using a tripod, remote control and the 30 second timer. Not too bad for selfies!!!)


All's well that ends well.

Happy Sewing